> ## Documentation Index
> Fetch the complete documentation index at: https://dev.moonpay.com/llms.txt
> Use this file to discover all available pages before exploring further.

# Quickstart

> Build a working MoonPay on-ramp integration in your browser, from setup to a live fiat-to-crypto purchase.

## Overview

<Frame>
  <img width="340" src="https://mintcdn.com/moonpay/Kzio-7fxRExSXZf_/images/widget/bb99175-Screenshot_2024-02-02_at_10.45.06_AM.png?fit=max&auto=format&n=Kzio-7fxRExSXZf_&q=85&s=587ad31286b3b9c87a67f5d912678cd7" alt="Quickstart overview" data-path="images/widget/bb99175-Screenshot_2024-02-02_at_10.45.06_AM.png" />
</Frame>

In this Quickstart, you will process cryptocurrency purchases via the MoonPay On-Ramp directly from your browser.

Whether you are a complete beginner to coding or a seasoned expert, this guide will take you through all of the necessary steps to have you converting fiat to cryptocurrency in no time.

## What you will accomplish

In this tutorial, you will:

<Steps>
  <Step>Configure On-Ramps widget in a local environment</Step>
  <Step>Create a new folder for code</Step>
  <Step>Initialize the widget in a file using HTML and JavaScript</Step>
  <Step>Edit the widget parameters</Step>
  <Step>Display the fully functional widget locally in your browser</Step>
</Steps>

## Prerequisites

Before beginning, you will need:

* **A MoonPay account**: If you do not have one, set one up on [this page](https://dashboard.moonpay.com/).
* **An IDE (coding software):** Some popular ones are [Visual Studio Code](https://code.visualstudio.com/) and [IntelliJ WebStorm](https://www.jetbrains.com/webstorm/). We will be using Visual Studio Code in this tutorial.
* **A web browser:** Any web browser will work. We will be using Google Chrome in this tutorial.

## Implementation

### Step 1: Set up a file for your integration

In your IDE, create a new file for your On-Ramp code. Ours will be called `on-ramp.html`.

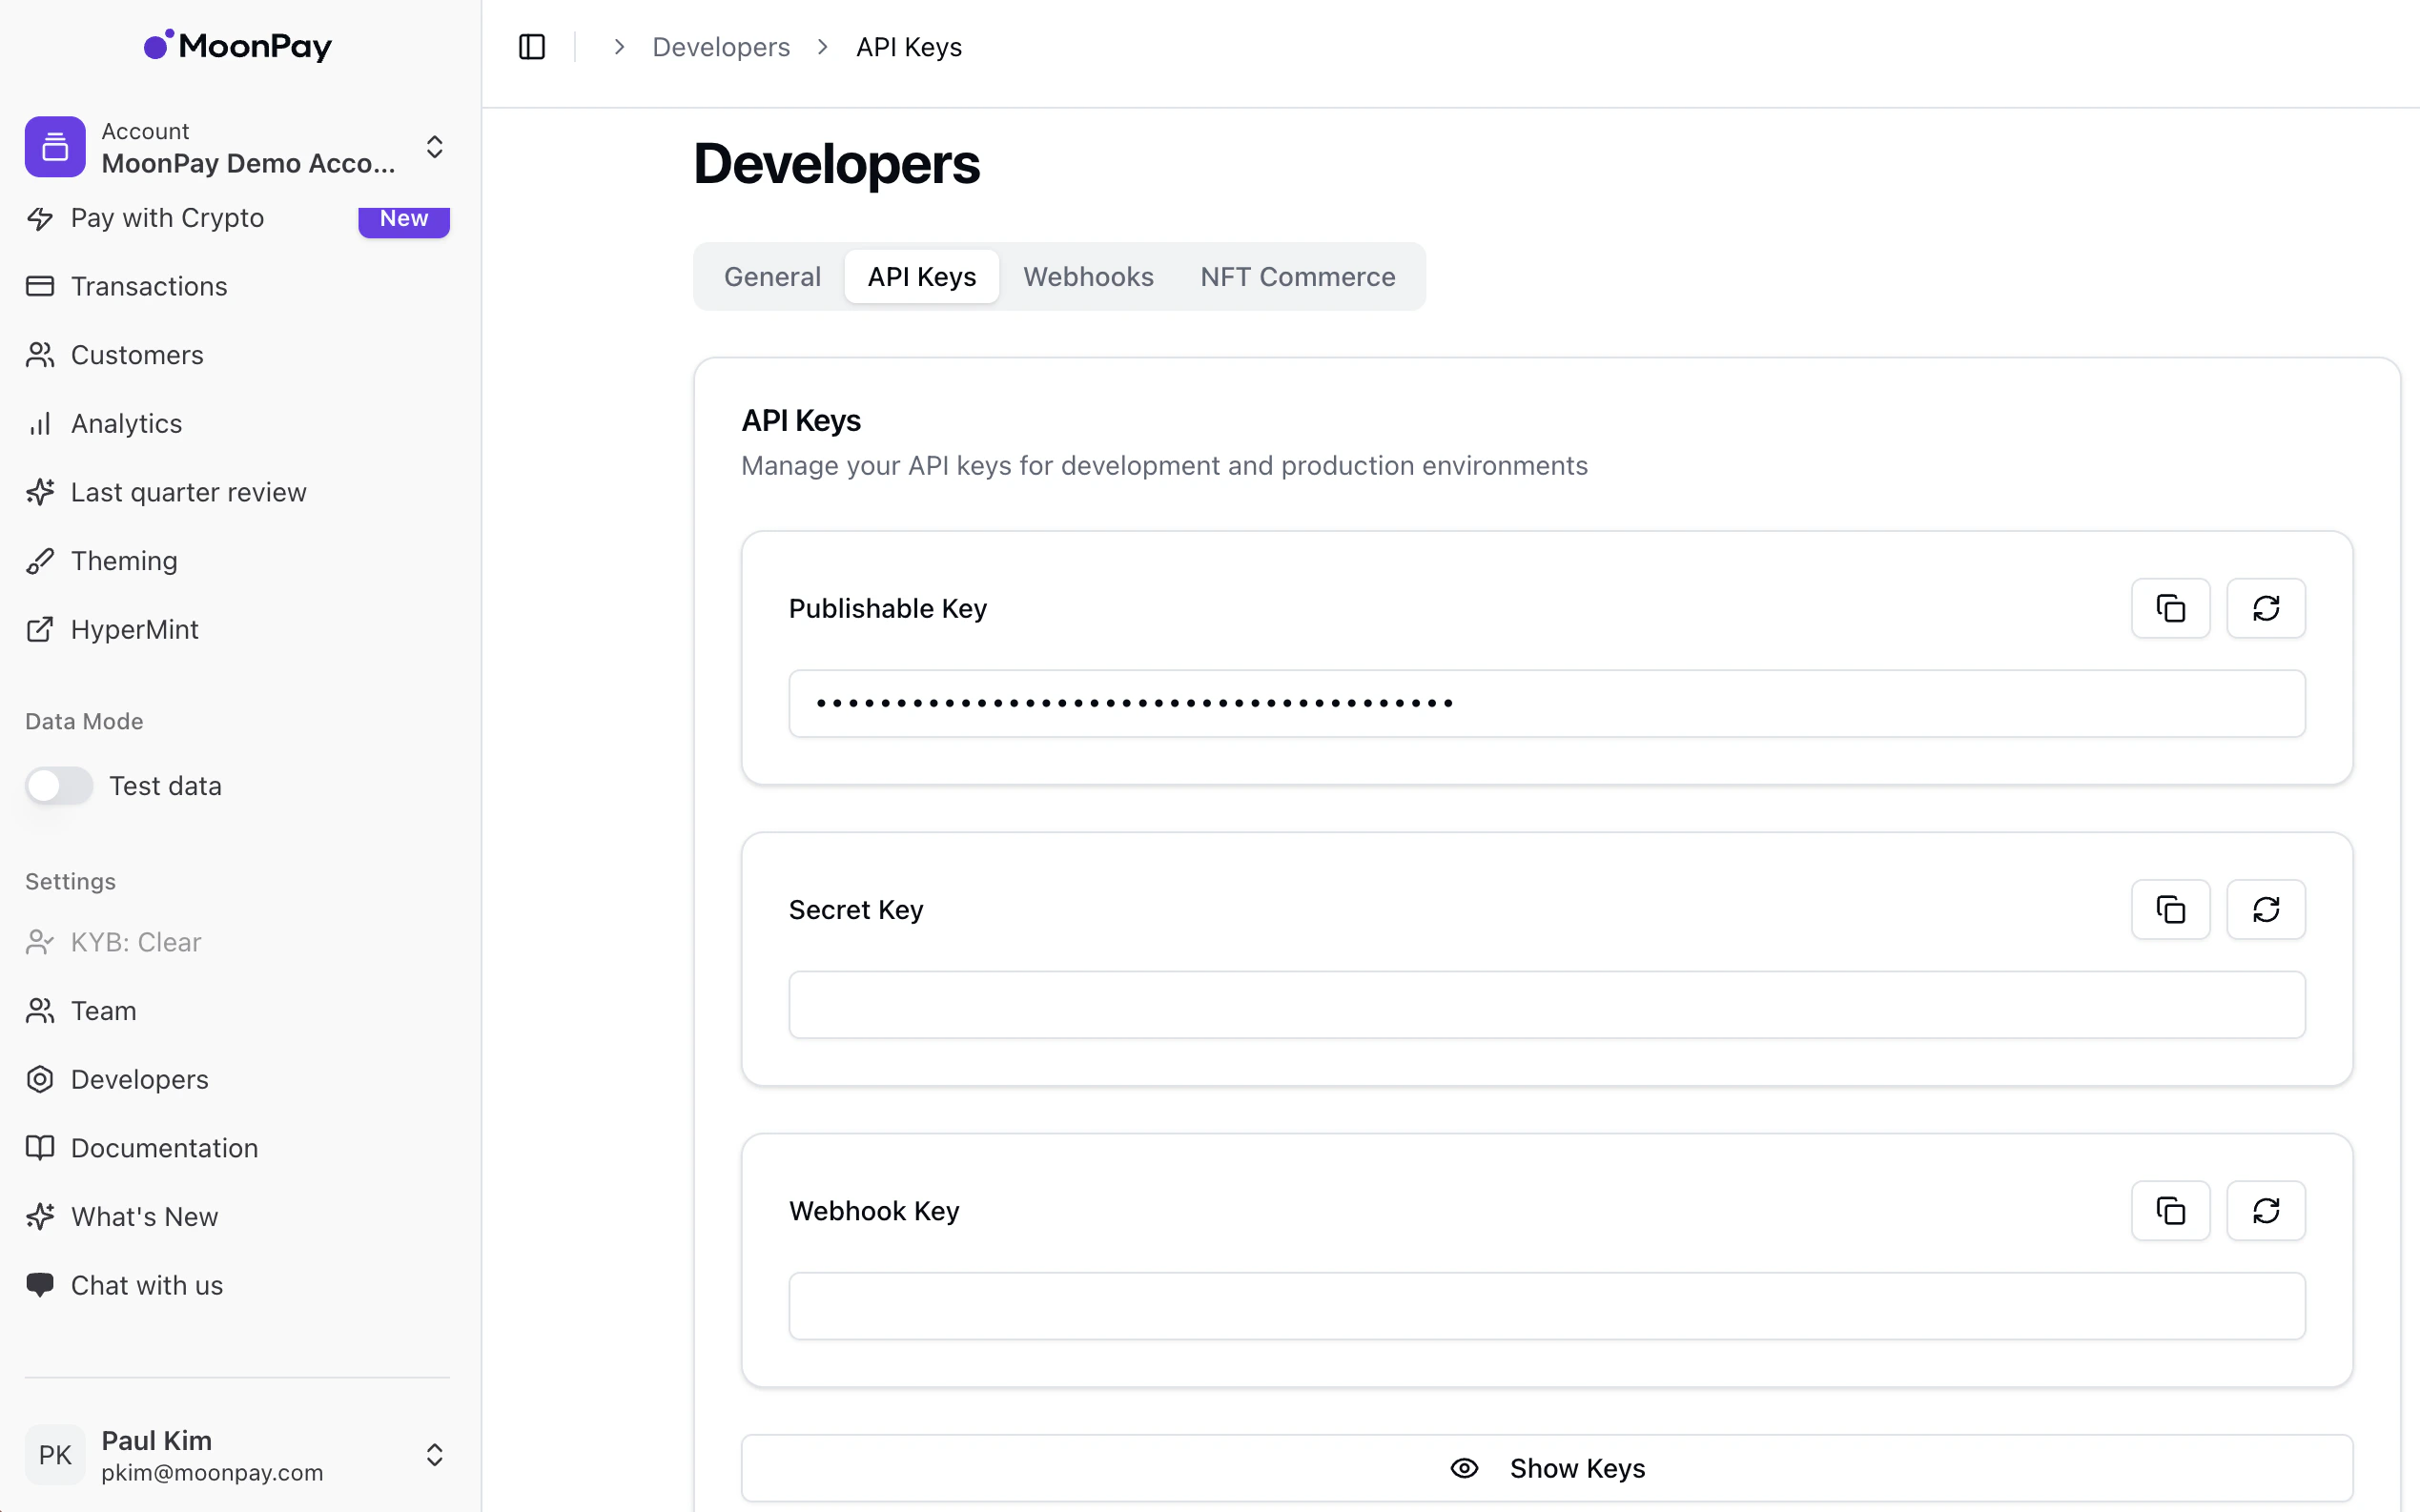
### Step 2: Retrieve API keys from the MoonPay Dashboard

* Navigate to your [MoonPay Dashboard](https://dashboard.moonpay.com/) and log in.
* Once logged in, navigate to the Developers tab on the sidebar → API Keys.
  * Here, you will be able to copy your API keys. In this tutorial, we will be using the publishable test key.

<Frame caption="Dashboard">
  <img src="https://mintcdn.com/moonpay/Kzio-7fxRExSXZf_/images/widget/c15f0dd11612fe5e7f642a3bb0f7fa046c9d0d75e346b8ef484321df104ef7af-Screenshot_2025-06-10_at_4.43.45_PM.png?fit=max&auto=format&n=Kzio-7fxRExSXZf_&q=85&s=a241d3f7a28e7e9bafc5dfccae6f4410" alt="Dashboard" width="2538" height="1586" data-path="images/widget/c15f0dd11612fe5e7f642a3bb0f7fa046c9d0d75e346b8ef484321df104ef7af-Screenshot_2025-06-10_at_4.43.45_PM.png" />
</Frame>

### Step 3: Insert HTML and code into `on-ramp.html`

* The code below will embed our Software Development Kit (SDK) directly into your HTML by way of `<script>` tags.
* You can think of this as a way of injecting code directly into HTML without having to create a separate linked file.

<CodeGroup>
  ```html on-ramp.html theme={null}
  <!DOCTYPE html>
  <html lang="en">
    <head>
      <meta charset="UTF-8" />
      <meta name="viewport" content="width=device-width, initial-scale=1.0" />
      <title>MoonPay Integration</title>

      <!-- Adds the MoonPay SDK as a script to your HTML file -->
      <script
        defer
        src="https://static.moonpay.com/web-sdk/v1/moonpay-web-sdk.min.js"
      ></script>

      <!-- Initialize the MoonPay SDK immediately upon page load -->
      <script>
        document.addEventListener("DOMContentLoaded", () => {
          const moonpaySdk = window.MoonPayWebSdk.init({
            flow: "buy",
            environment: "sandbox",
            variant: "overlay",
            params: {
              apiKey: "pk_test_123", // Replace with your MoonPay publishable API key
              baseCurrencyCode: "usd",
              baseCurrencyAmount: "30",
              defaultCurrencyCode: "eth",
            },
          });

          // Open widget
          moonpaySdk.show();
        });
      </script>
    </head>

    <body>
      <div class="container"></div>
    </body>
  </html>
  ```
</CodeGroup>

* This script will detect when the HTML page loads and immediately run the JavaScript within the `<script>` tags when the load has finished. Remember to replace `pk_test` with your publishable API key from **Step 1**.

* You can customize widget functionality (currencies, amounts, etc.) by adding and removing parameters in the JavaScript, whilst still preserving proper formatting.
  * All parameters can be found on [this page of our documentation](/widget/on-ramp/customization/parameters).

* For example, if we would like to display the widget with a default of *100 GBP worth of BTC*, and also specify the `walletAddress` in the parameters so that the user is not prompted for theirs, we could modify the JavaScript like such:

```html SDK Setup theme={null}
<script>
  document.addEventListener("DOMContentLoaded", () => {
    const moonpaySdk = window.MoonPayWebSdk.init({
      flow: "buy",
      environment: "sandbox",
      variant: "overlay",
      params: {
        apiKey: "pk_test", // Replace with your MoonPay publishable API key
        baseCurrencyCode: "gbp",
        baseCurrencyAmount: "100",
        defaultCurrencyCode: "btc",
        walletAddress: "enter your wallet here",
      },
    });

    // Open widget
    moonpaySdk.show();
  });
</script>
```

### Step 4: Do a test transaction

* The first step of processing a test transaction using the MoonPay On-Ramp is to make sure that `environment` is set to`"sandbox"`, as shown above in the example code. This puts your widget in test mode.
* Next, open up the widget, enter your email address, and log in.

<Frame caption="Login">
  <img width="340" src="https://mintcdn.com/moonpay/Kzio-7fxRExSXZf_/images/widget/72d6ca9e7b4e3a637d7ead77a0448c0b8c0a8a143b58a2563d3ac88c470dc5c1-Screenshot_2025-06-10_at_4.50.06_PM.png?fit=max&auto=format&n=Kzio-7fxRExSXZf_&q=85&s=ead6c27b23d8b83bb54b8e3b378f8733" alt="Login" data-path="images/widget/72d6ca9e7b4e3a637d7ead77a0448c0b8c0a8a143b58a2563d3ac88c470dc5c1-Screenshot_2025-06-10_at_4.50.06_PM.png" />
</Frame>

* Next, you will be asked to enter a wallet address if one hasn’t been passed through the parameters already. If you already have existing wallet addresses with MoonPay, they will show up here. Any wallet address will work for a test transaction.
* Next, go and grab a test card from [this page of our documentation](/widget/sandbox-testing#adding-a-payment-method).

<Warning>
  Never use a test credit card on anything other than a test widget that has
  environment: "sandbox", otherwise your MoonPay account may be blocked.
</Warning>

* If successful, you should see a screen that looks like the below.

<Frame caption="Login">
  <img width="340" src="https://mintcdn.com/moonpay/Kzio-7fxRExSXZf_/images/widget/418264efb550b61086d6ab8b66627d2ab03b912220854929f966b726c31386c2-Screenshot_2025-06-10_at_4.48.34_PM.png?fit=max&auto=format&n=Kzio-7fxRExSXZf_&q=85&s=1f0e5543fa6abd272e426b77dafd4d91" alt="Order complete" data-path="images/widget/418264efb550b61086d6ab8b66627d2ab03b912220854929f966b726c31386c2-Screenshot_2025-06-10_at_4.48.34_PM.png" />
</Frame>

## Completion

Congratulations, you have just integrated the MoonPay On-Ramp! 🎉

There are so many ways to integrate this widget to enhance user experience when buying cryptocurrency. If you want to know about alternative ways to integrate with MoonPay, check our [Integrations (SDKs)](/widget/on-ramp/integration-methods/sdks/overview) page.

Any questions? Feel free to visit our [Help Center](https://support.moonpay.com/en/) to dig into our other resources or drop us a line!
