
Integration design guide
Build your integration with the MoonPay Standard—proven insights from top-performing partner integrations that drive revenue and usability.
Go-live requirements
To receive your production API keys, the following integration requirements must be met.
| Requirement | Description | Link to section |
|---|---|---|
| Multiple entry points | All partner apps should add multiple entry points to the on-ramp.
| Buy button placement |
| Amount input | Partner apps with an amount input screen should show:
| |
| Payment method selection screen | Partner apps with a payment method selection screen should show:
| |
| Provider selection screen | Partner apps with multiple providers should show:
| Provider selection |
| Pre-fill the customer's email address | Partner apps that know the customer's email address should pre-fill this using the email parameter to skip the login screen in the MoonPay widget. | Pre-fill the customer's email address |
| Pre-fill the customer's wallet address(es) | Partner apps that know the customer's wallet address(es) should pre-fill this to skip the wallet address screen in the user journey.
| Pre-fill the customer's wallet addresses in the widget |
| Transaction tracking | All partner apps should display a toast message after the user completes their transaction with a link to the MoonPay transaction tracker. Alternatively, display a toast message with a link to your app's own transaction history page. | Track the order status |
| Mobile app configuration | All partner mobile apps, configure app and browser so KYC and payment methods in the widget work correctly.
| Mobile integrations |
User journey demo
Explore the demo below for an end-to-end showcase of a well-designed on-ramp integration with a wallet partner.
Implementation details
Buy button placement
All partner apps must show buy buttons in the following:
- Home screen
- Main app navigation
- Cryptocurrency-specific screens
Highly visible Buy buttons in these areas reduces the number of clicks for users to transact and improves the user experience. You should also Buy buttons wherever users expect to be able to transact, like their wallet, NFT purchase sections, trading screens, and other screens specific to your app.
ImpactA minimum 2x increase in transaction volume based on data from a basket of partners including Uniswap.
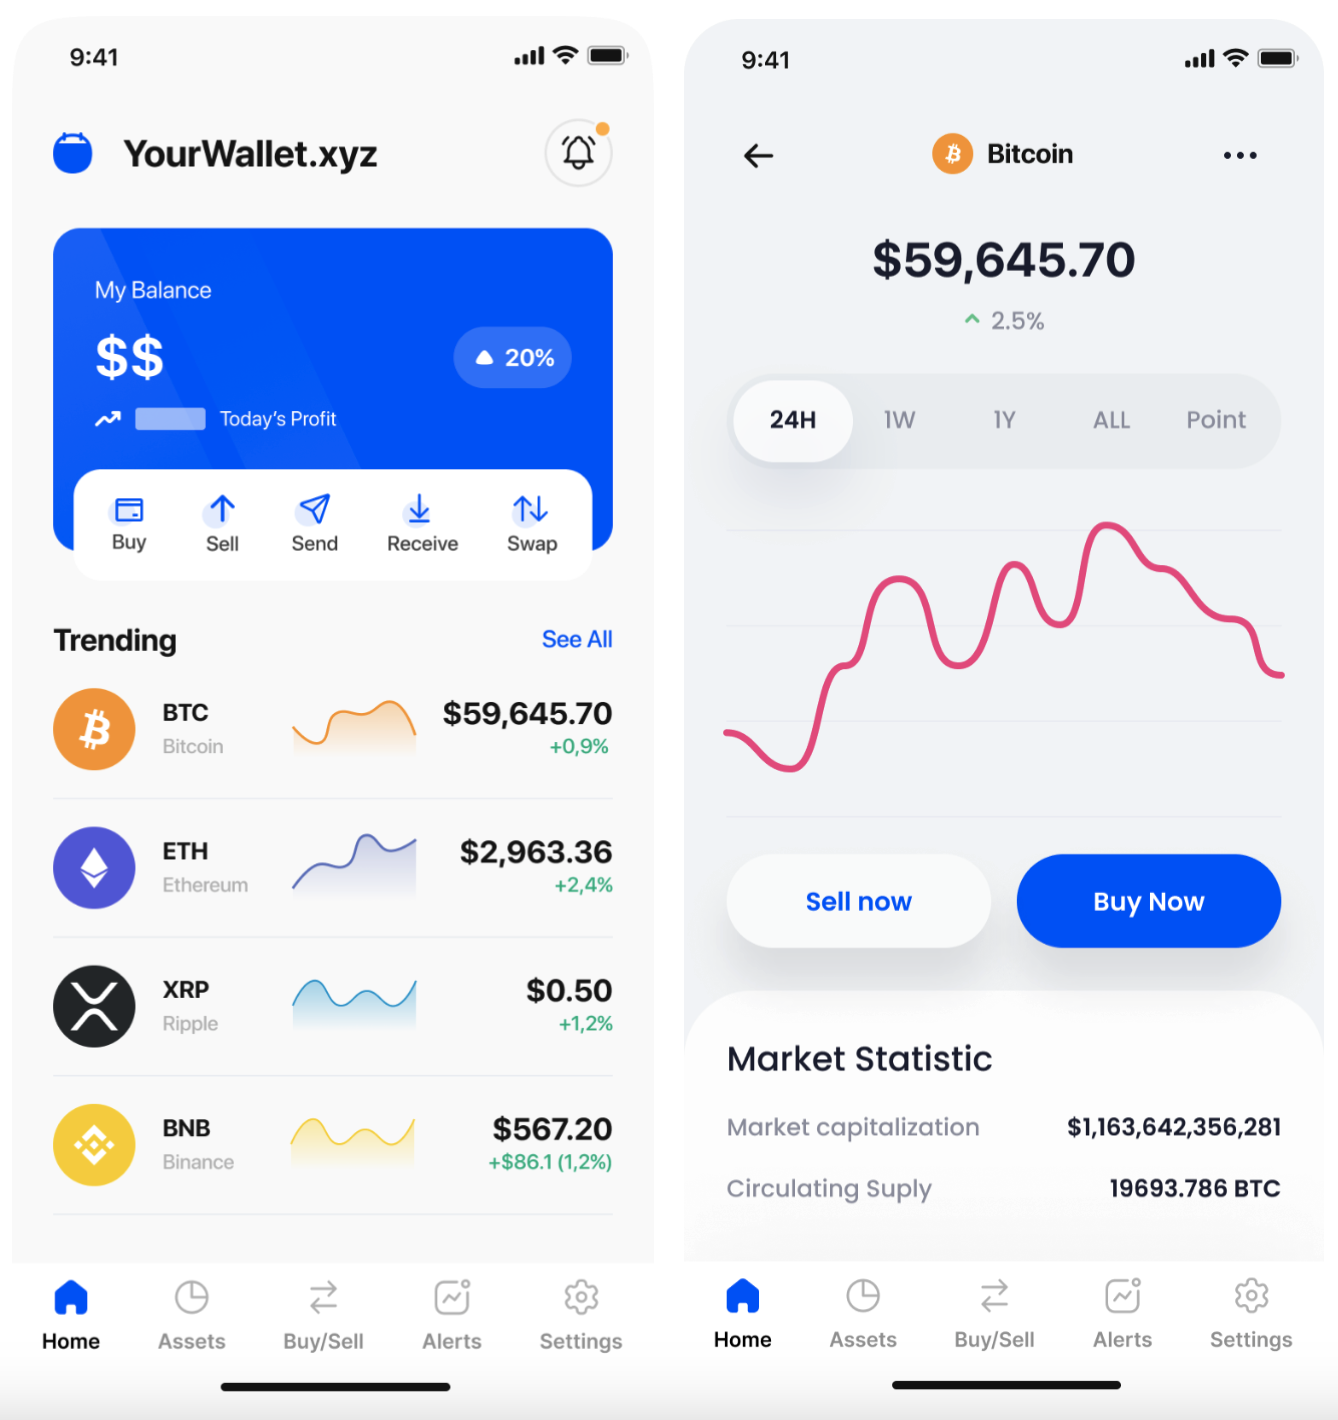
Prominent buy button on the home screen and for the individual cryptocurrency
Currency selector
When a user clicks on the Buy button, it should be easy to find crypto to purchase:
- List all cryptocurrencies available for purchase through your MoonPay integration
- Include a search bar and filters for ease of use
- Show the currency icon, abbreviation, full name, and network of each token so users can easily browse the list. Cryptocurrency and Fiat asset images can be found by accessing our v3/currencies API.
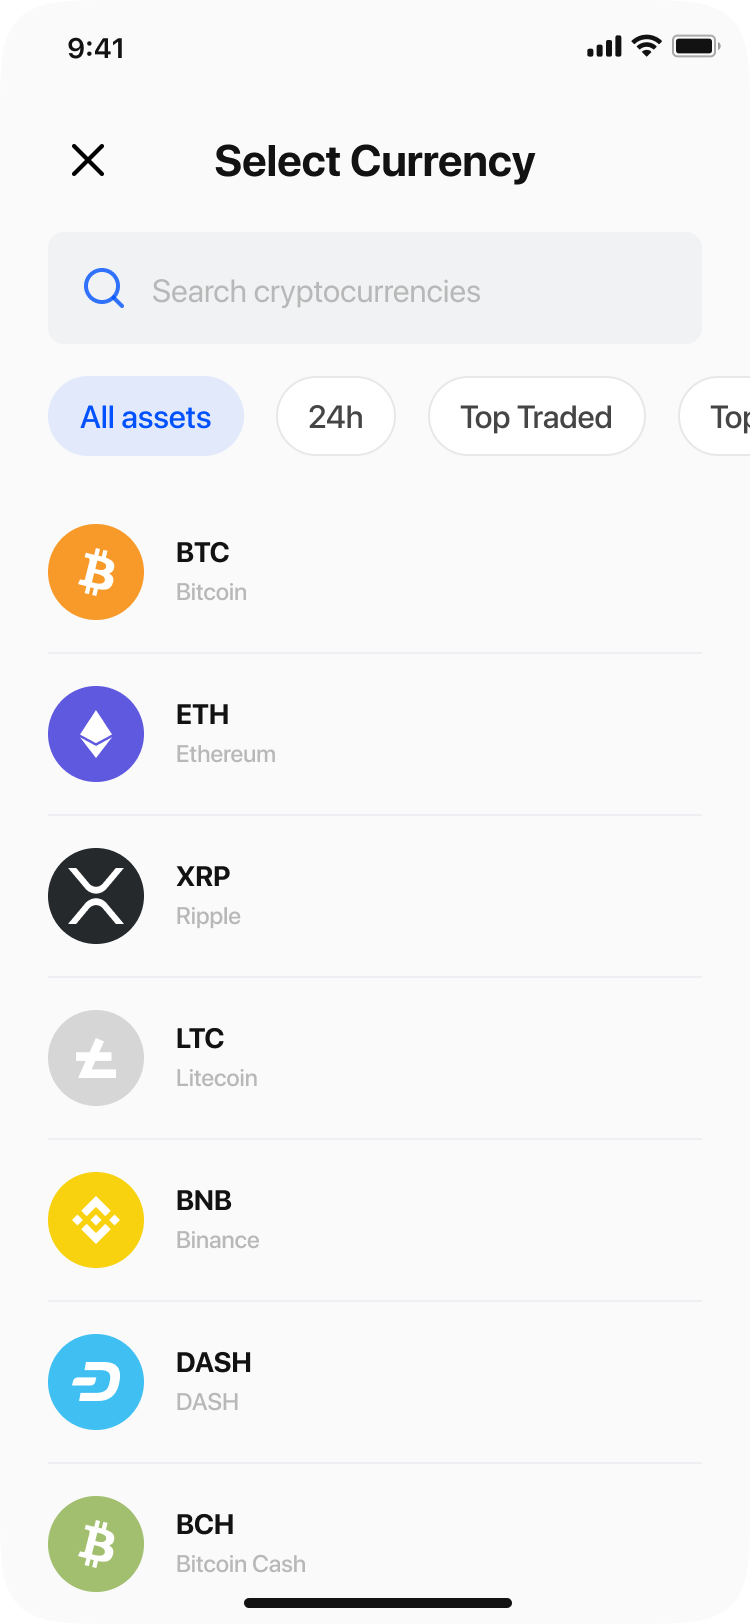
Currency selection screen with search and filters
Amount input screen
A dedicated screen in your app for the user to select the amount, crypto, and fiat for their transaction provides a more seamless experience with the MoonPay widget.
For partner apps that have an amount input screen, use the following design elements for ease of use:
- When opening the MoonPay widget, pass the widget parameters
currencyCodewithbaseCurrencyAmountorquoteCurrencyAmountto pre-fill the fiat or crypto amount. - Allow users to change which crypto they're purchasing on this screen without leaving the flow
- Validate minimum and maximum buy amounts against our Limits endpoint
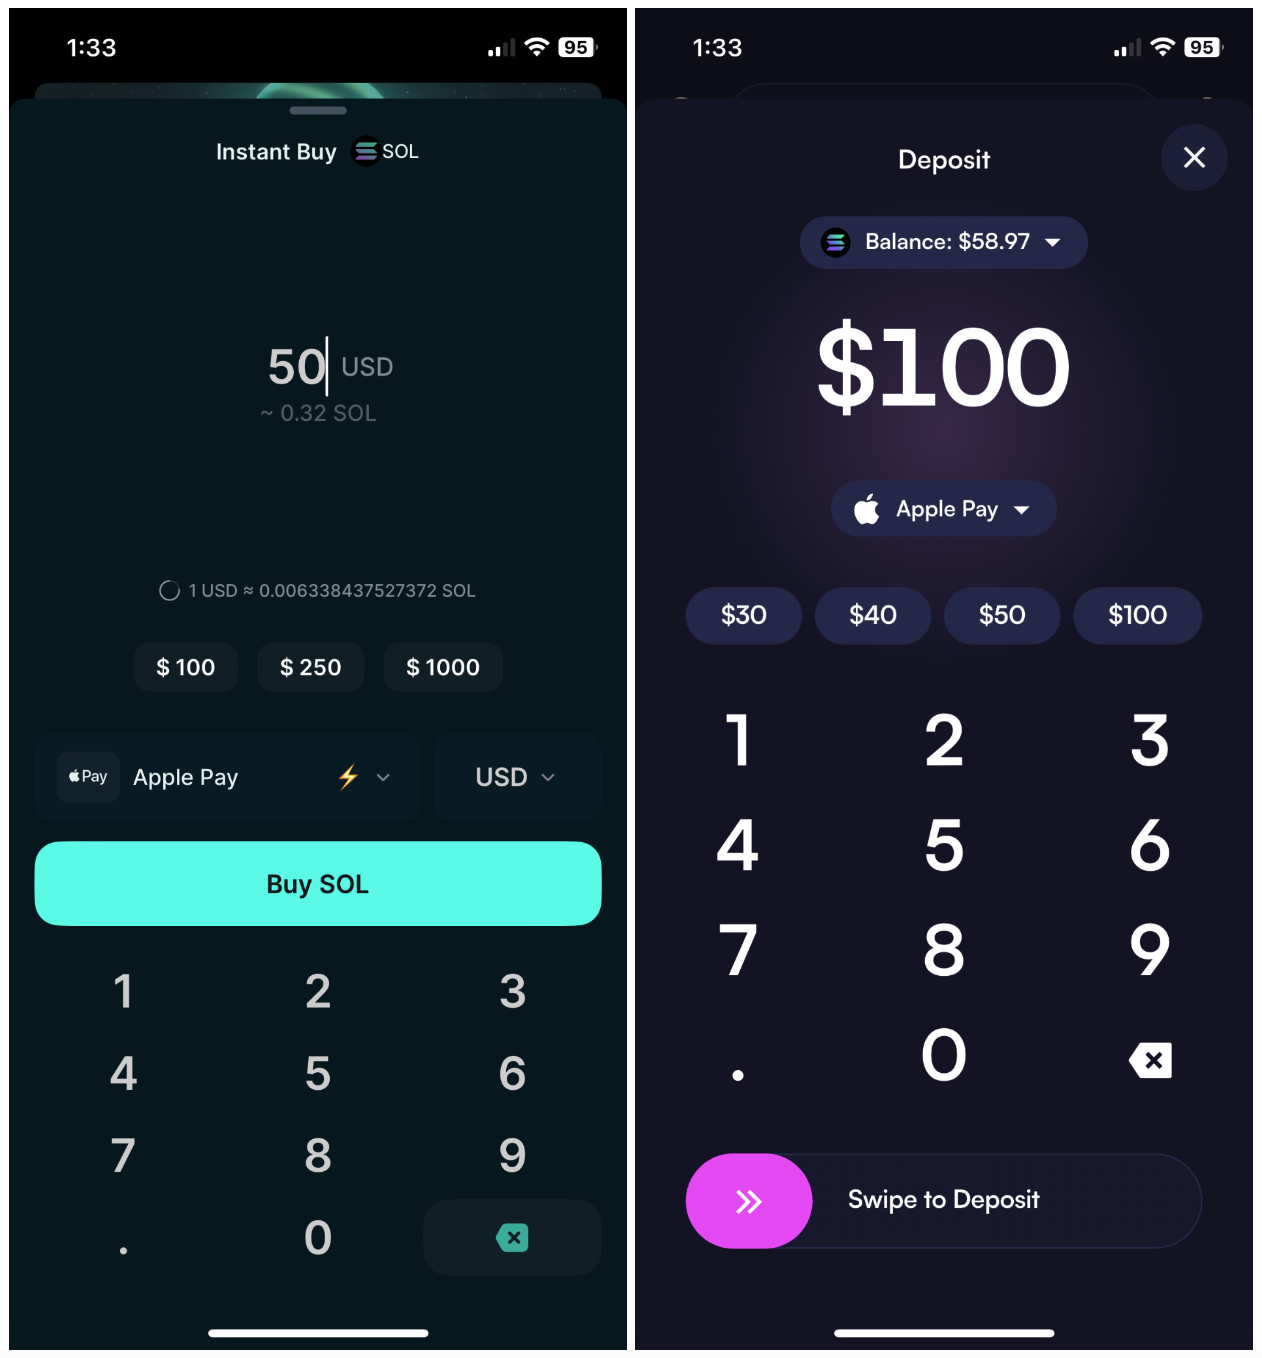
Simple and easy to use input screens
Minimum and maximum buy limits
For partner apps that have an amount input screen, ensure a seamless user experience between your app and the MoonPay widget by checking entered amounts against our GET v3/currencies/:currencyCode/limits endpoint. Please note that the quote provided in this endpoint represents a platform-wide floor value, not a user-specific value. Widget errors caused by invalid amounts will require the user to re-enter the amount to buy, which adds another step and impacts the user experience.
Impact
- Partners that offer transactions over $10K see a 45% higher median for completed transaction volume.
- Partners also see 3% of their total completed volume from transactions over $10K.
Amount screen
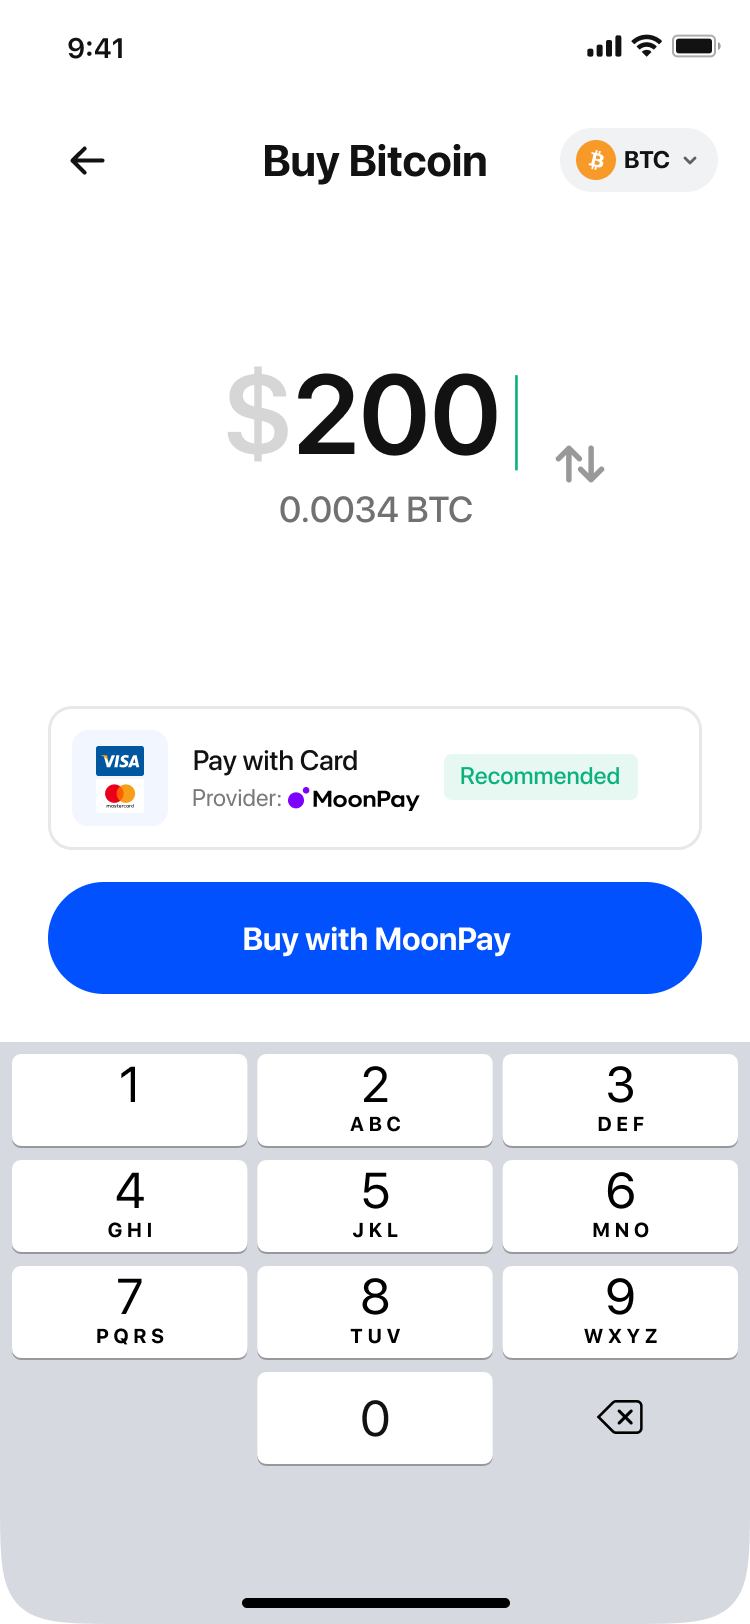
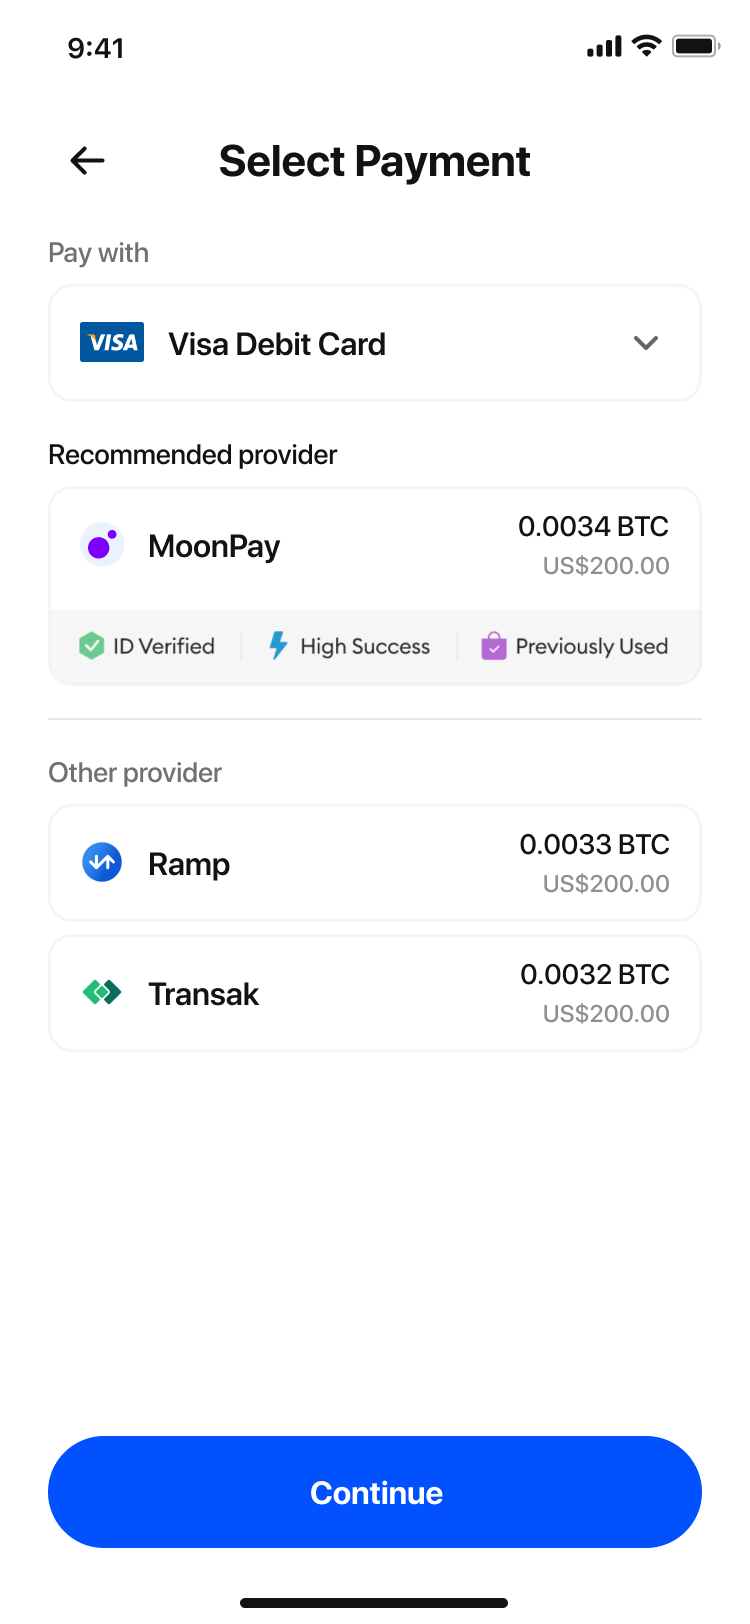
Payment method selection
For partner apps with a payment method selection screen:
- Show all payment methods supported by MoonPay, depending on the user's region and currency
- All available payment methods per transaction type, region, and fiat currency can be surfaced using the
/payment_method_configendpoint
- All available payment methods per transaction type, region, and fiat currency can be surfaced using the
- Show payment method details that are returned in the
/payment_method_configresponse- Use payment method logos
- Show estimated transaction completion times
- Default to Apple Pay on iOS, as Apple Pay typically has higher transaction success rates
- Pre-fill the
?paymentMethodwidget param with the selected payment method
A payment method selection screen in your app lets your customers easily choose how they want to transact while also getting more accurate quotes. If your app has a payment method selector, it's highly recommended to use the /payment_method_config endpoint to surface all available payment methods. Otherwise, you'll need to periodically update your app as we release new payment methods:
- Update
?paymentMethodwhen calling the/buy_quoteendpoint and showing the widget - Add the new payment method as an option in your app, including the logo, estimated transaction completion times
- Any other payment method-specific requirements
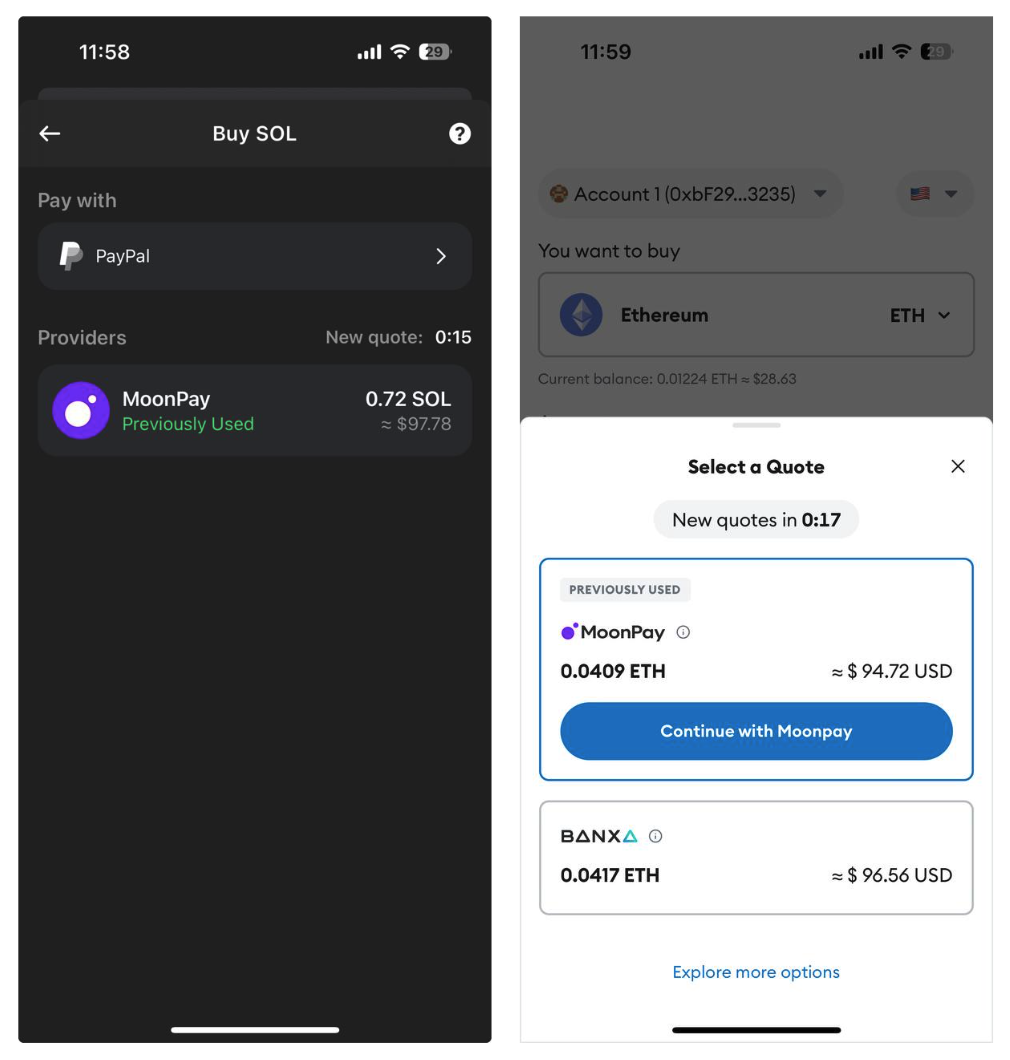
Provider selection
For partner apps that offer ramps providers other than MoonPay, display key context on a provider selection screen, including:
-
ID verifiedbadge for users who have completed KYC - Quotes from our
/buy_quoteendpoint usingpaymentMethod - Supported payment methods and their logos
ID verified and previously used badges
ID verified and Previously used badges ensure a frictionless experience for returning users by indicating that their KYC has been completed. Our data show that returning users can be less price-sensitive than new users, preferring a more convenient checkout experience with fewer steps. This is crucial even if MoonPay is your exclusive provider, as displaying a previously used badge helps remind and reassure users.
Call our GET /v3/customers/badges endpoint with the customer's wallet address and we will return the customer's KYC status which you can use to show the ID verified badge.
Impact
- User retention rates are 70% higher when they know they've transacted before.
- 30% of wallet address that get passed to our Badges endpoint are already KYC'd.
Including a "Previously Used" prompt is a powerful reminder
Payment method logos
Build customer trust by displaying the supported payment and payout method logos for your integration. For customers new to crypto, these familiar payment methods indicate a safe checkout process.
Download these logos as a ZIP file and review the supported payment / payout methods below:
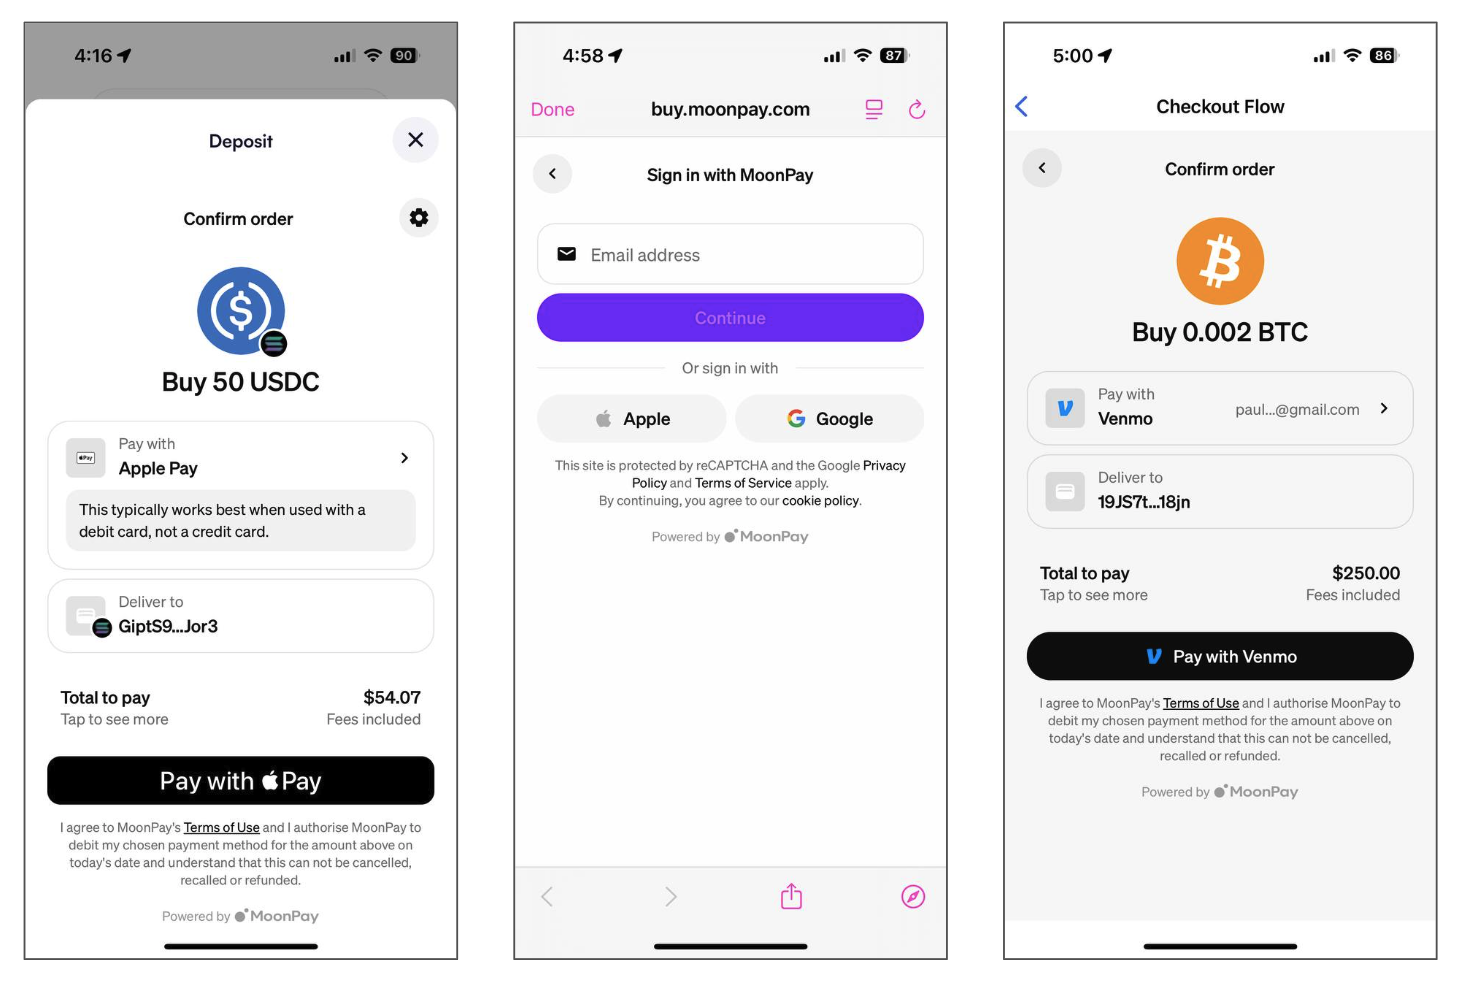
Provider selection screen
Loading screen
Use logos to guide the user when redirecting the user to MoonPay. Before opening the MoonPay widget, show a loading screen with both your logo and MoonPay’s logo to build user trust and set expectations about the user journey.
Additionally, you can use the MoonPay dashboard to create a custom loader for your widget:
- Go to the B2B dashboard
- Navigate to "Theme" → "Loader"
- Choose your preferred loader type (MoonPay default or generic spinner)
- Select custom colors to match your brand
- Save changes
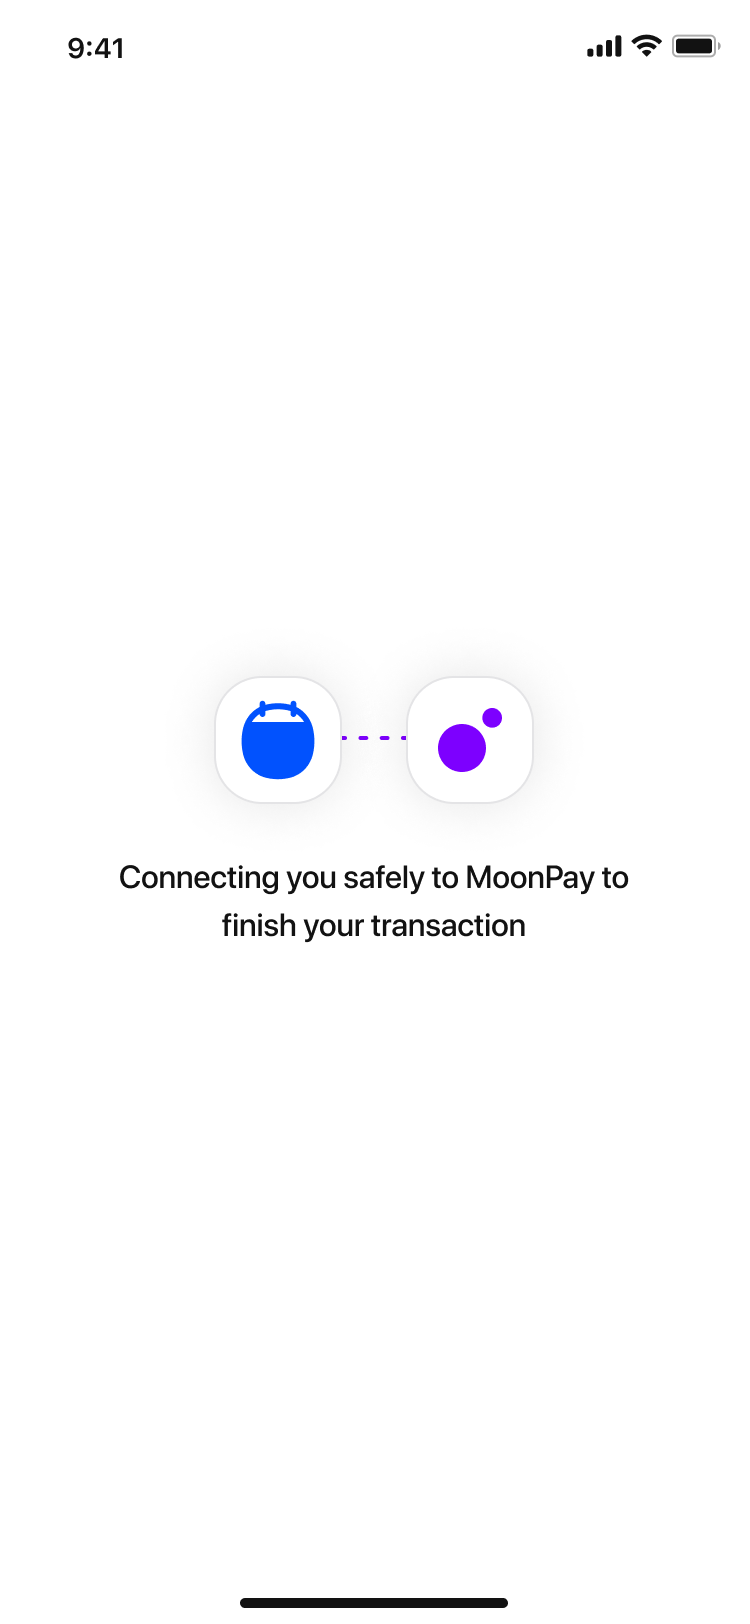
Loading screen before opening the MoonPay widget
Skip the amount screen
By default, the first screen in the MoonPay widget asks the user to confirm the amount of crypto to purchase. If your app has an amount input screen, you can skip the amount screen in the MoonPay widget for a more seamless end-to-end customer journey and increase conversions by 6%.
Pass the following widget parameters:
currencyCode + baseCurrencyCode baseCurrencyAmount + walletAddress + signature
Impact
- Skipping the initial amount screen increases conversions by 6%.
Login options
Pre-fill the customer's email address
Partner apps that know the user's email address must pre-fill the customer's email address by passing the email widget parameter, so the customer won't be prompted to enter one. The widget will skip to the MFA code screen.
Returning customers that are logged in are 5% more likely to complete a transaction than returning customers that are not logged in. By pre-filling the customer's email address, you can capture some of this shortfall and increase transaction volume.
Impact
- Returning customers that are logged in are 5% more likely to complete a transaction.
- For new users who haven't transacted before, this is even higher at 25% more likely to complete their first transaction.
Pre-fill the customer's wallet address
Partner apps that know the user's wallet address(es) must use the walletAddress or walletAddresses parameters to skip the wallet address screen in the buy flow.
Impact
- Pre-selecting the currency, transaction amounts and wallet address to skip the initial screen of the widget increases conversions by 6%.
- Users who have to manually enter the wallet address results in 5% reduction in overall transactions created.
When using the walletAddress parameter, you must also:
- Pass currencyCode or baseCurrencyCode and
- Sign URLs server-side
You can alternatively use the walletAddresses parameter to pass multiple wallet addresses with their corresponding chains. The user will be able to choose from a filtered list of cryptocurrencies limited to those you pass in the parameter, and the wallet address screen will also be skipped.
Pre-select the payment method
Use the paymentMethod parameter to pre-select the user's payment method and match what they chose in the partner app.
Track the order status
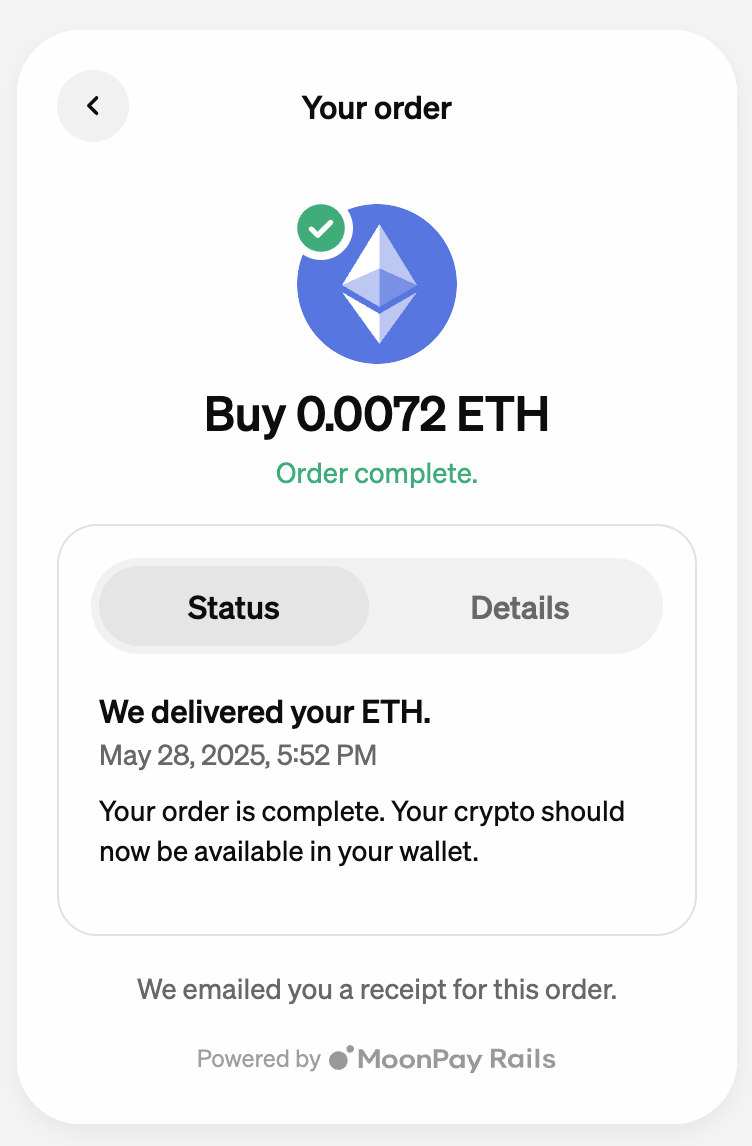
All partner apps must provide some kind of transaction tracking, whether a toast message that links to the MoonPay transaction tracker or your app's own transaction history screen.
After a user completes the buy flow in the MoonPay widget, it's crucial for them to be able to monitor their order's progress and understand its status. Increased transparency results in greater user trust and returning users who are 13% more likely to return and complete another transaction.
ImpactIncreased transparency results in greater user trust and returning users who are 13% more likely to complete another transaction.
MoonPay facilitates this through the use of webhooks and APIs. Webhooks provide real-time order updates to a specified endpoint of your choice, while the API allows for on-demand retrieval of the latest order status.
Both our webhooks and API offer consistent data, giving you the flexibility to employ either or both methods as per your requirements.
-
Transaction tracking toast message: After a user completes a transaction, show a toast message that persists until the crypto has been received in the user's wallet. When clicked, either the MoonPay transaction tracker or your app's transaction history page should open.
- Partners not able to use webhooks for this toast message should implement a transaction history screen and use API calls to retrieve transaction data on-demand.
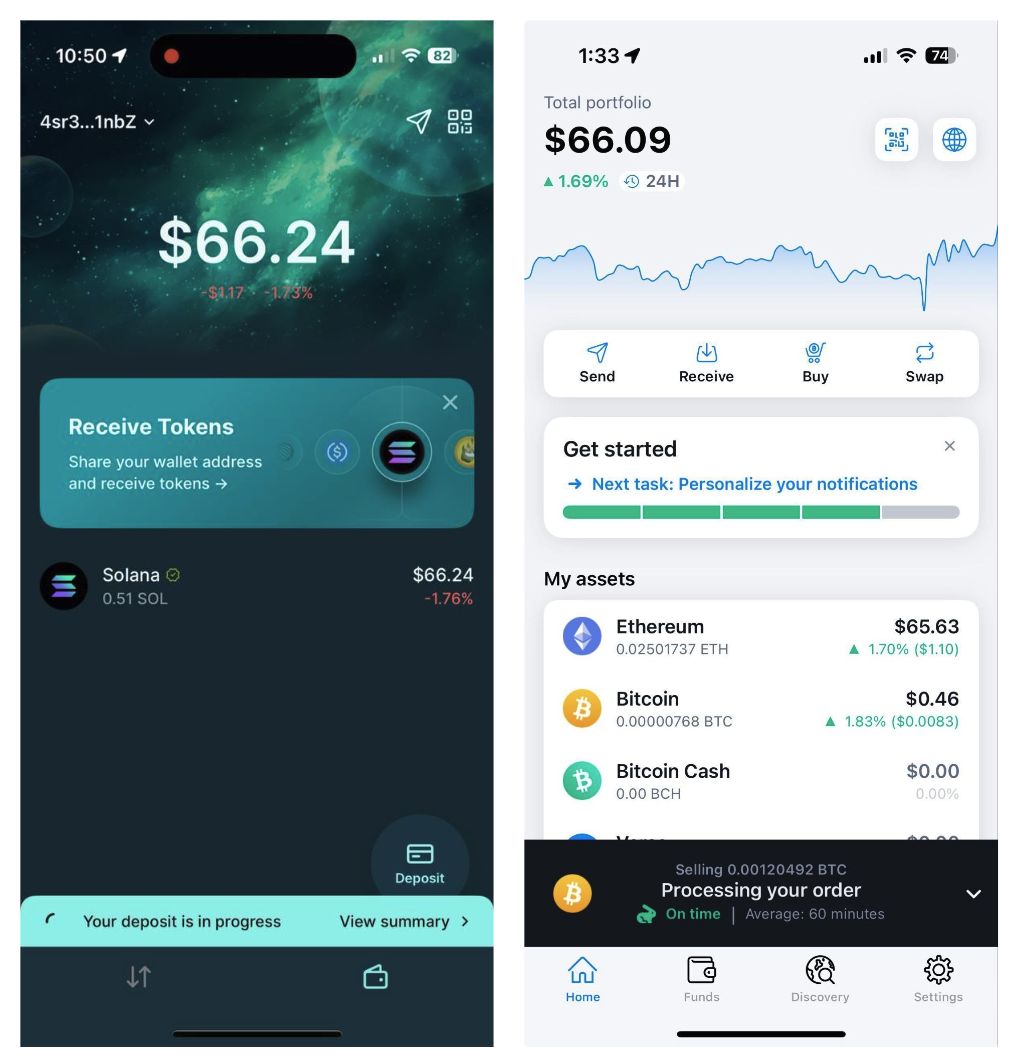
Transaction tracking toast messages in partner apps
-
Use the MoonPay transaction tracker: We return the transaction tracker URL in our webhooks and API in the
data.returnURLobject.
Example tracker URL:https://buy.moonpay.com/transaction_receipt?transactionId=45751523-c3e2-47a5-ad0f-e5cb89e94037.
You can optionally pass theapiKeyparameter to enable your custom theme on the tracker.
- Use your own transaction tracker: You can optionally create your own transaction tracking screen that shows transaction data from our API and webhooks. We recommend that partners use the
redirectURLparameter to route users to your destination URL (HTTPS or Universal/App Link) instead of the default MoonPay order status screen. Custom-scheme links (e.g., myapp://…) are not supported. To enable automatic redirection for users, please contact your MoonPay representative.
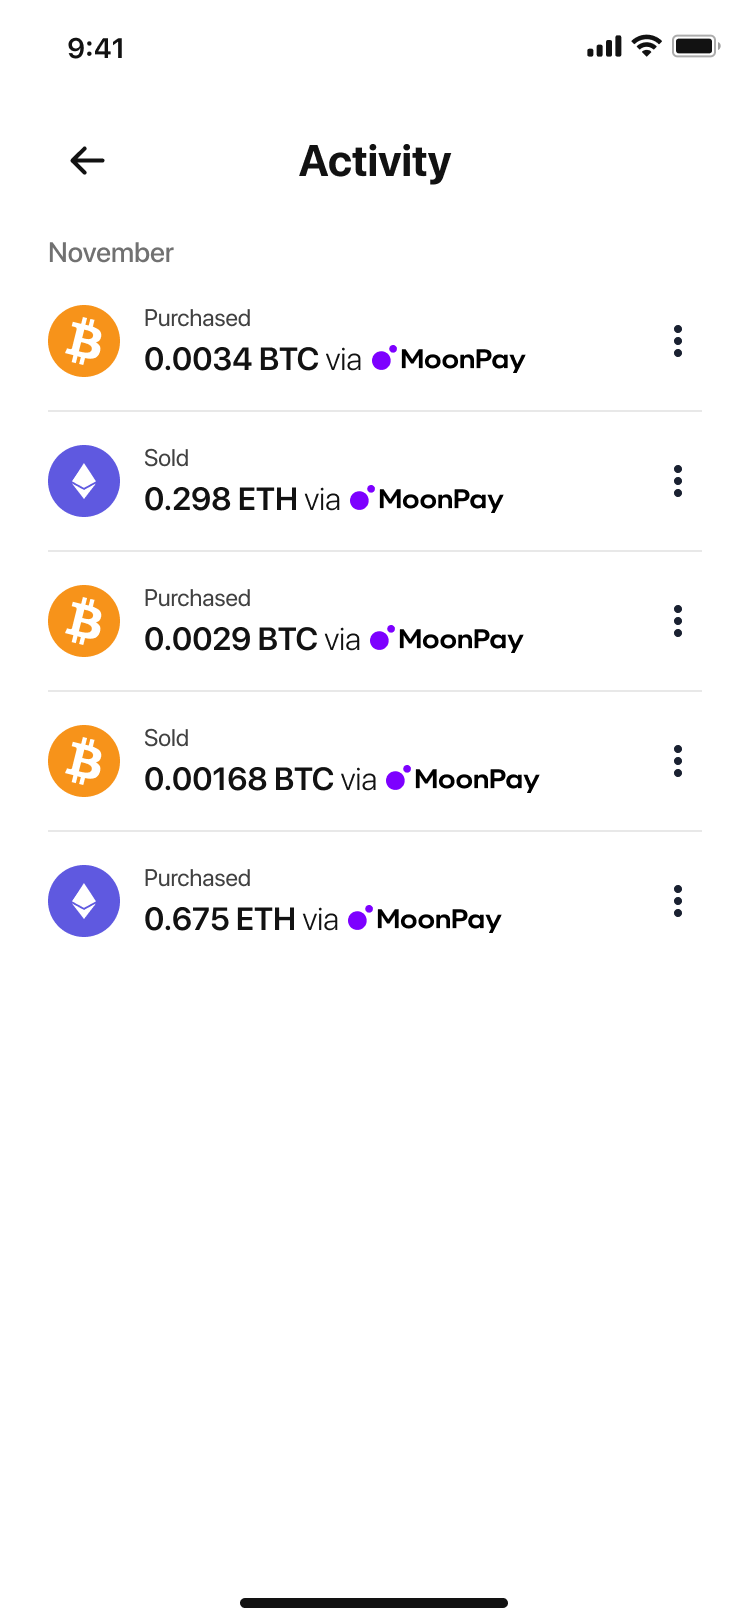
Custom transaction history screen
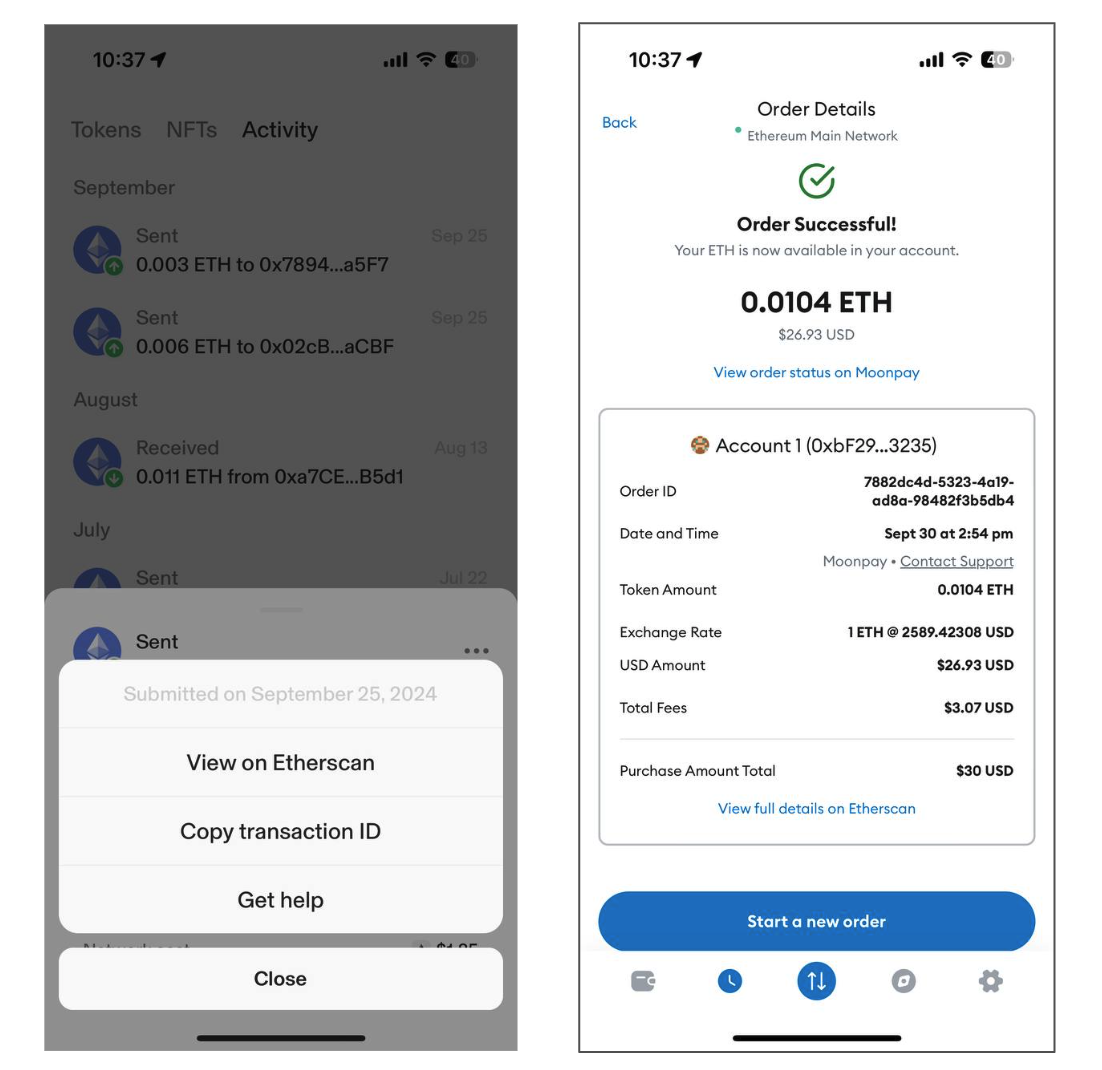
Custom transaction history screens in partner apps
API and webhook objects for transaction tracking
Additional examples and details for all parameters can be found in our transaction API documentation under the 200 Responses section.
| Object | Description | Notes |
|---|---|---|
cryptoTransactionId | On-chain transaction hash that can be searched on the corresponding blockchain explorer | |
status and failureReason | Order status and failure reason. Failure reason will be set only if the transaction status is failed. | Possible values |
stages and stages.failureReason | Order stage and failure reason. Failure reason will be set only if the stage is failed. | Possible values |
id | Unique MoonPay transaction ID that can be added to the MoonPay transaction receipt URL | |
externalTransactionId | Your transaction identifier that was passed in the externalTransactionId widget parameter. This identifier will be present whenever MoonPay sends you transaction data. | |
createdAt | Timestamp of when the transaction was created | |
currency.name and currency.code | Cryptocurrency name and code, e.g. Ethereum and ETH |
Mobile integrations
All partner mobile apps must follow these guidelines for setting up in-app browsers.
iOS in-app browser setup
Use a full screen in-app browser and remove the navigation bar to provide a more native user experience.
Full screen in-app webview on iOS
Step 1: Screen implementation
import { WebView } from ‘react-native-webview’

const YourMoonpayWidgetScreen = ({ route: { params: { moonpayWidgetUrl }, }, }) => <WebView source={{ uri:moonpayWidgetUrl }} enableApplePay />
Step 2: Register screen as a modal in the navigator
This enables the widget to slide up from the bottom of the screen.
import { createNativeStackNavigator } from ‘@react-navigation/native-stack’
const Stack = createNativeStackNavigator()

<Stack.Navigator> // ...other screens <Stack.Screen name=”yourMoonpayWidgetScreenName”

component={YourMoonpayWidgetScreen} options={{ presentation: ‘modal’ }} /> </Stack.Navigator>
Step 3: Configure the screen
Configure the screen so that all payment methods and KYC steps work correctly:
- Allow pop-ups at the in-app browser level so the customer can use PayPal, Venmo and Revolut without seeing an error
- Follow the App Requirements for KYC section below so the customer can upload their KYC documents and complete a selfie check.
Android in-app browser setup
On Android we recommend loading the MoonPay widget within the react-native-inappbrowser-reborn as it supports Google Pay out of the box.
import InAppBrowser from 'react-native-inappbrowser-reborn';

export const openBrowser = async ({ link }) => {
  try {
    InAppBrowser.close();
    const browserResult = await InAppBrowser.open(link, {
      forceCloseOnRedirection: false,
      showInRecents: true,
      animated: true,
    });

    // Automatically closes the browser if there is an issue with loading the widget.
    if (browserResult?.type === 'dismiss') {
      InAppBrowser.close();
    }

    return browserResult;
  } catch (e) {
    // handle error
  }
};
App requirements for KYC
When not using a MoonPay SDK, make sure that the following requirements are met so that users can successfully complete KYC (Know Your Customer) steps.
These requirements make sure that customers can complete each KYC step, including uploading documents and doing a selfie check. Failing to follow these steps will cause new customers to drop off, as they won't be able to finish KYC or make a purchase.
General app requirements for all implementations
All partner apps should ensure the following:
-
Feature-Policyheader for your webpage / frame or any other container has no restrictions for initializing camera like valuecamera 'none'. -
Permissions-Policyheader doesn't restrict access to a camera and microphone (for some cases) and if allow is set check for"camera; microphone"values. - When using iOS WKWebview you may need to set
allowsInlineMediaPlaybacktotruein theWKWebViewConfigurationused in your app. This adjustment ensures that media content, like a camera feed, can be displayed properly within the web view, rather than forcing full-screen playback. - Your website is being run on a secure
httpsconnection.
WebView requirements
Partner apps that use WebView should ensure the following:
- The web view is able to access device local storage and initialize camera (for older iOS versions, the camera can be accessed only from Safari browser or WebView with
SFSafariViewController) - HTML5 video playback is allowed (
<video>tags are being used to send instructions): if video-instructions are not played, try usingWebChromeClientto enable video playback - Autoplay in fullscreen mode is disabled and
allowsInlineMediaPlaybackis set astruefor WebView - The selector file is implemented on your side (required for KYC document uploads)
Iframe requirements
Partner apps that use iframe should ensure the following:
-
Parent page header has no restrictions for initializing the camera, e.g.
camera=()- Parent page can alternatively include
camera=*in the Permissions-Policy header
- Parent page can alternatively include
-
The iframe allow property has
allow="accelerometer; autoplay; camera; encrypted-media; gyroscope; payment"
Feature comparison
When choosing what type of in-app browser to use, review the features that are compatible with each.
Note that certain mobile payment and social sign-in configurations are not compatible with certain in-app browsers, for example WebView is not compatible with Google Pay and Google sign-in.
| Feature | Chrome Custom Tabs | SFSafariViewController | WebView | Iframe |
|---|---|---|---|---|
| Apple Pay | ❌ | ✅ | ✅ | ❌ |
| Google Pay | ✅ | ❌ | ❌ | ❌ |
| Apple sign-in | ✅ | ✅ | ✅ | ✅ |
| Google sign-in | ✅ | ✅ | ❌ | ✅ |
| SDK events | ❌ | ❌ | ✅ | ✅ |
Apple Pay, Google Pay, and social sign-in in partner apps
Customize logos and themes
Custom logos
Contact your MoonPay team to customize the logos in the transaction emails.
- 1 rectangular logo for transactional emails (jpg or png formats)
Custom themes
Customize your widget's theme in your MoonPay dashboard. Themes are tied to API keys and will be applied whenever you pass your API key to the MoonPay widget and transaction tracker.
ImpactUsers are 20% more likely to get past the code (OTP) verification screen when the MoonPay widget has custom theming.
Adding Domains to the whitelist
Be sure to add your HTTPS domain in the MoonPay dashboard. This ensures the MoonPay widget loads correctly, as only approved domains are permitted for security reasons.
Updated 8 days ago