
Integration Guide
Step One: Complete integration prerequisites
If you haven't already, please complete these prerequisite steps. If you're having any challenges, or have questions on this step please reach out to [email protected] or your Account Director.
Step Two: Build your entry points
To create a full experience, you'll need to build two native entry points within your app, the Create account and Top up entry points.
Create account
You'll need to build an entry point within your native app so users can open their virtual accounts. This should be a button and optional banner on your home page prompting users to open a Virtual Account. This button and banner should be displayed for users in supported regions.
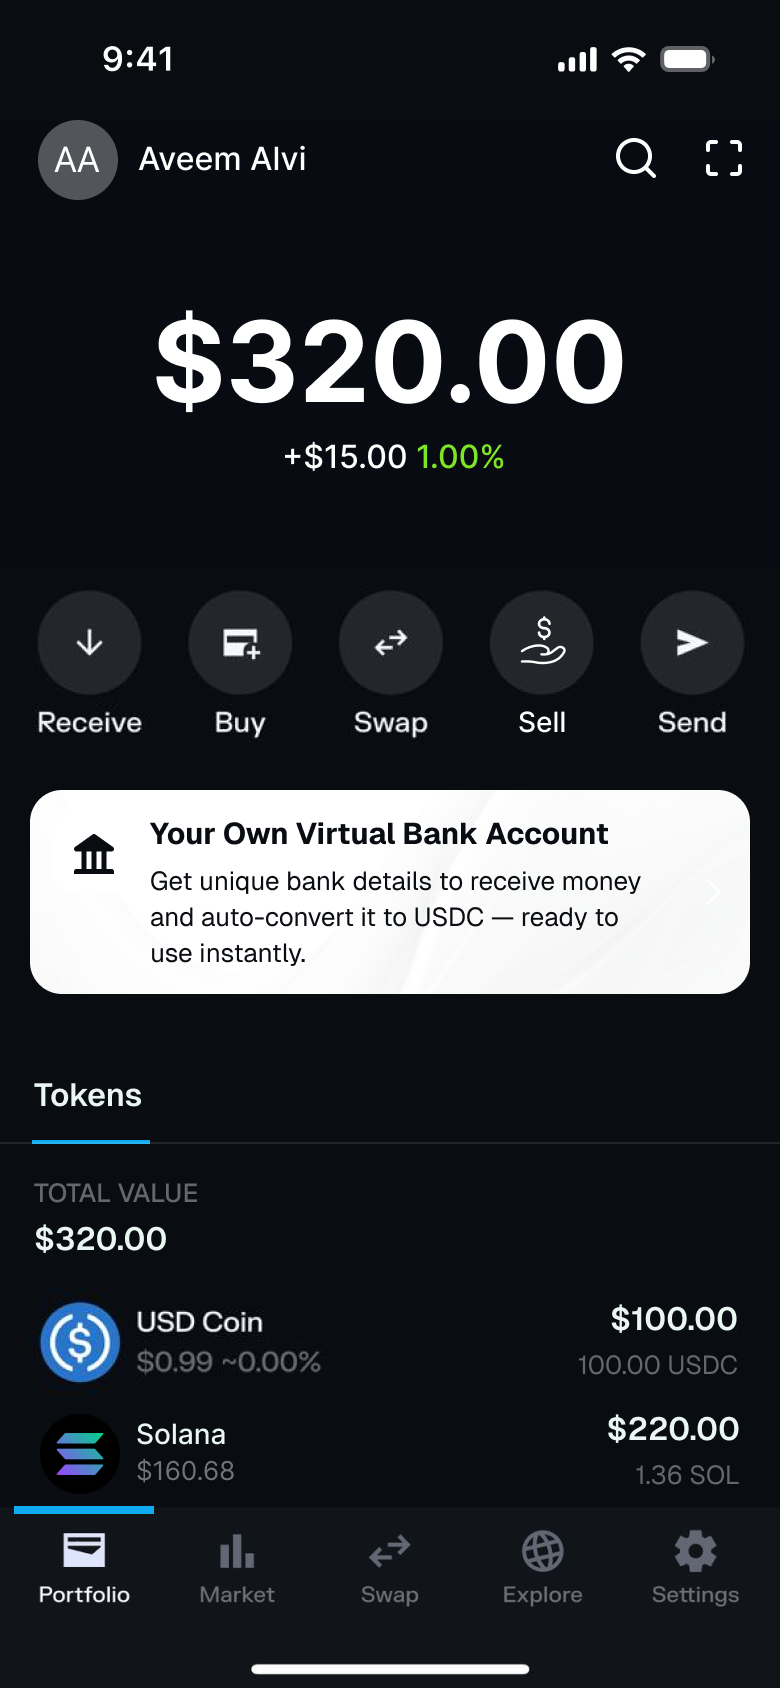
Entry point for account creation
Clicking on your Create account entry point should generate a URL which will open in an iframe or mobile in-app browser. Use the base URL <https://buy.moonpay.com/v2/virtual-account> and refer to our Mobile Integrations guide for the best way to render this URL in your app.
Notice:When testing Virtual Accounts in Sandbox, you must complete KYC. Although the MoonPay widget may display an option to skip KYC, doing so will cause the flow to fail. KYC verification is required in Sandbox for Virtual Accounts. Our team is actively working to remove the "Skip KYC" option in this environment.
To create their virtual account, the end-customer will log in to the MoonPay widget and if required, complete KYC. If the user has already passed KYC, they will not need to KYC again and will proceed directly to account creation.
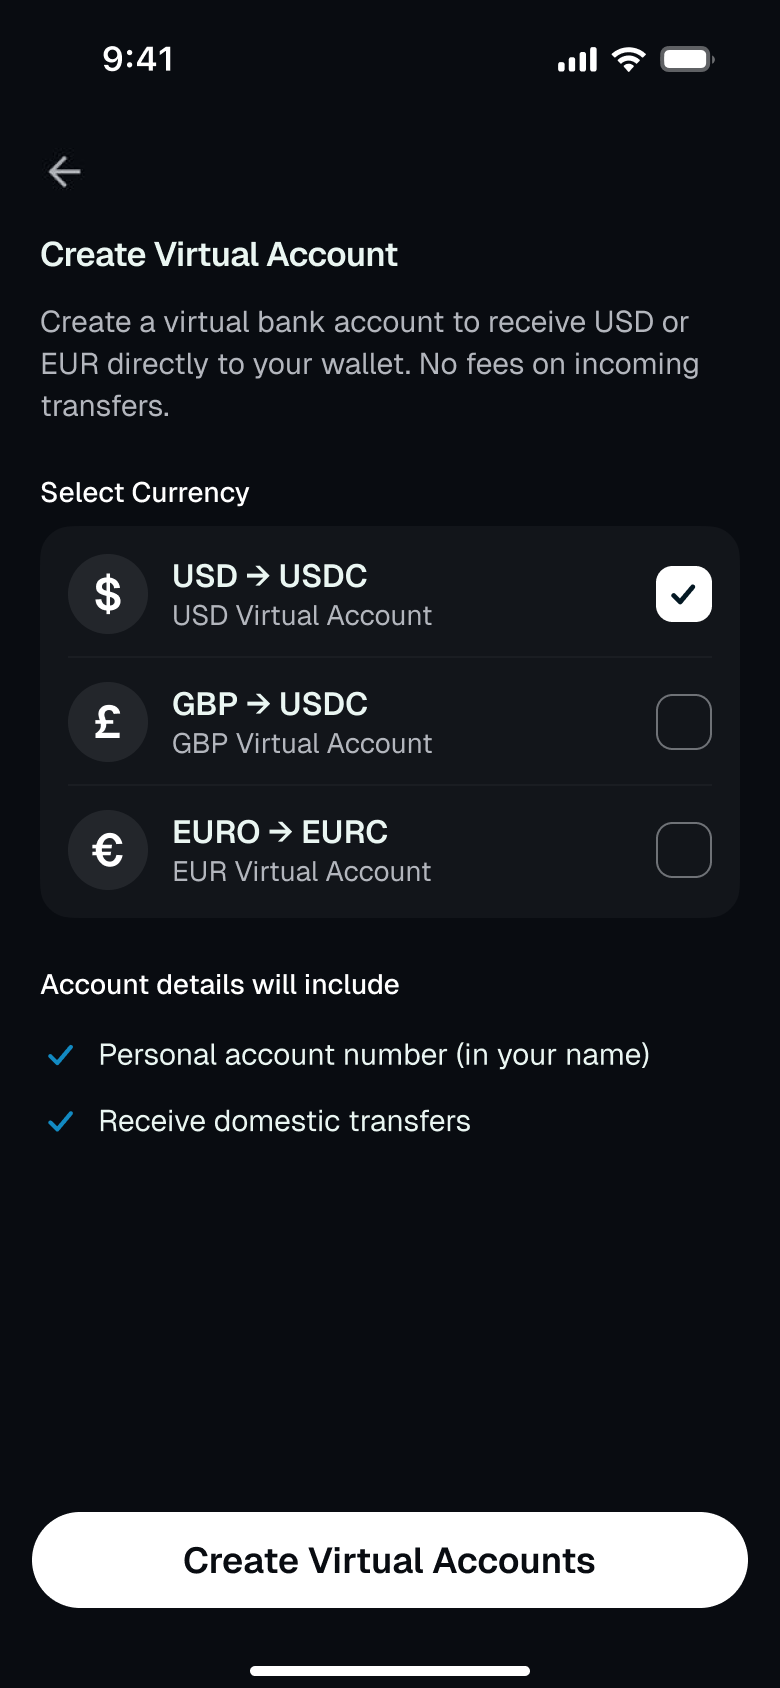
Currency selection and account creation
The table below lists the URL parameters supported by MoonPay Virtual Accounts onboarding. We highly recommend that you collect the user's depositCurrencyCode and token natively before opening the MoonPay widget in order to skip screens in the journey and reduce friction.
| Parameter | Description |
|---|---|
apiKey required | Your publishable API key. This is used to assign customers and transactions to your MoonPay account. |
externalCustomerId | An identifier you would like to associate with the customer. This identifier will be present whenever we pass you customer data, allowing you to match our data with your own existing customer data. |
walletAddress required | The customer’s wallet address where they will receive EURC, USDC or USDT. |
walletAddressIsPartnerGenerated required | Confirms that the partner owns the wallet address. Possible values: true, false |
signature required | When showing the Virtual Accounts widget, you must sign the URL. Values of other parameters need to be URL-encoded in order to generate a valid signature. |
sourceCurrencyCode (recommended) | The fiat currency code of the virtual account. Pre-select the deposit currency code to skip the currency selection screen. Possible values are: gbp, eur, usd. |
destinationCurrencyCode (recommended) | The code of the destination cryptocurrency and the network. in the format: "token_network". Possible values: usdc_sol, usdt_sol, eurc_sol. |
theme | Light and dark modes according to the themes built in your MoonPay dashboard. Possible values: light, dark. |
email | The customer's email address. If you pass a valid email address, the customer won't be prompted to enter one. If a customer is already logged in and their e-mail address doesn't match with the URL address, the customer will be logged out automatically. |
redirectUrl | A URL you'd like to redirect the customer to after they complete the virtual account open flow in the widget. HTTPS or Universal/App Link URLs are supported. Custom-scheme links (e.g., myapp://…) are not supported. |
Sign URL
Wherever you show the Create account entrypoint, you'll need to sign the widget URLs , as the URL contains the user's wallet address.
Top up & transaction history
After a user has created their MoonPay Virtual Account, you will need a final entry point to take them directly into the top up experience. After the customer finished the onboarding, the same URL could be used to view top up details of the virtual account: <https://buy.moonpay.com/v2/virtual-account>
These are the only parameters should be passed to the URL:
| Parameter | Description |
|---|---|
apiKey required | Your publishable API key. This is used to assign customers and transactions to your MoonPay account. |
theme | Light and dark modes according to the themes built in your MoonPay dashboard. Possible values: light, dark. |
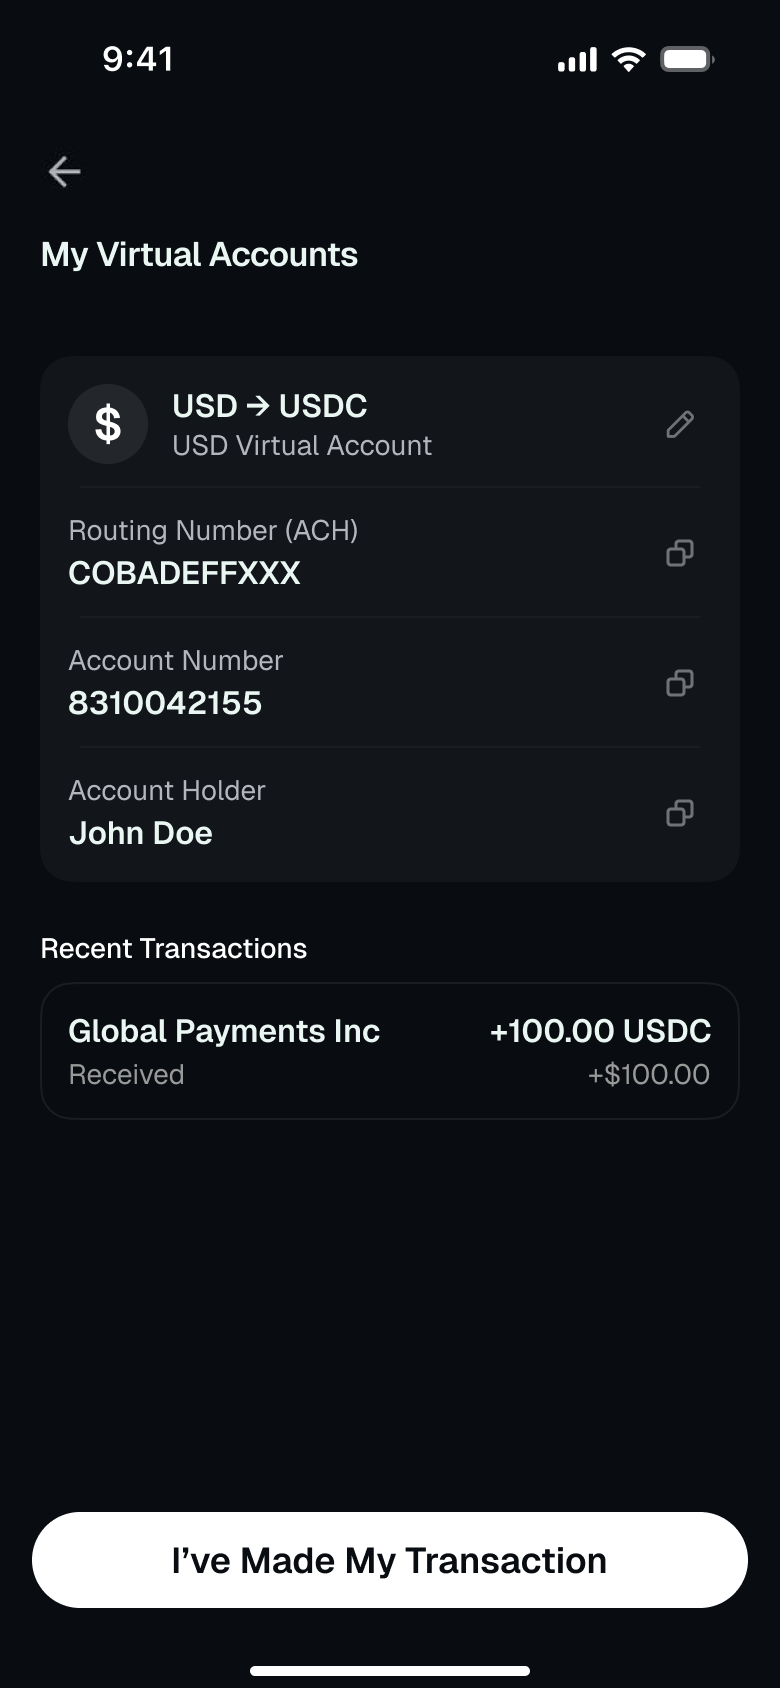
Step Three: Build account detail screen
Next, you'll build a screen in your native app to show the user's Virtual Account details so they know how to top up. Note, MoonPay can provide this screen to end-customers via the widget, but viewing details will require users to re-login which introduces friction to the journey. Then use Get Virtual Account Details Endpoint from Step Seven to fetch data.
- Bank routing number / IBAN
- Bank account number
- Bank name
- Bank beneficiary name
- Bank address
Confirm account details natively in your app
Step Four: Build transaction tracking
To ensure end-customers have clarity on the status of their transaction, we recommend you build basic transaction tracking capabilities. If your app has an Activity section, you may want to populate these transactions there too. Then use Get Virtual Account Transactions Endpoint from Step Seven to fetch data.
Step Five: Generate private and public key pair
- Generate your key pair using these commands:
openssl genrsa -out private_key.pem 2048
openssl rsa -in private_key.pem -pubout -out public_key.pem- Save your private key and don't share it with anyone; we will never ask you to share your private key.
- Login to MoonPay Dashboard
- Go to Developers Tab and click on API Keys
- Find the
Public Keyfield on the page, copy the Public Key content that you generated in Step 1, and paste it in. - Press the
Uploadbutton to upload your Public Key.
Step Six: Sign your request payloads
Before calling the Virtual Accounts API, you must sign your request payload using the private key you generated at the previous step. You'll pass this in the header of the request.
Here's an example of how we expect you to sign your payloads and send a request.
const fs = require('fs');
const crypto = require('crypto');
const axios = require('axios');
const { DateTime } = require('luxon');
const privateKey = fs.readFileSync('./private_key.pem', 'utf8');
const publishableKey = 'pk_live_key'
const timestamp = DateTime.now().toMillis();
const queryString = `/v1/virtual-accounts/transactions?apiKey=pk_test_xxx×tamp=1234567890`;
const sign = crypto.createSign('SHA256');
sign.update(queryString);
const signature = sign.sign(privateKey, 'base64');
axios
.get(`https://api.moonpay.com${queryString}`, {
headers: {
'x-signature': signature,
},
})
.then((res) => {
console.log(res.data);
});We expect you to pass your Publishable Key and a Timestamp in milliseconds as query parameters.
The signed request is only valid for 5 minutes; after that, it will expire to prevent replay attacks.
Ordering of query parametersWhen signing API requests, be aware that incorrect signatures may be generated if the URL encode function you use sorts query parameters alphabetically under the hood. To ensure requests are signed successfully, make sure your parameters are sorted alphabetically before signing, so that the order matches that of the actual request itself.
This is a common issue when using the Go net/url library's
Encode()method, though this can happen also when using other libraries.
Step Seven: Get account and transaction details via API
- To fetch Virtual Account details use: Get Virtual Account Details Endpoint :
- To fetch Virtual Account Transactions, use Get Virtual Account Transactions Endpoint
Appendix
URL signing
MoonPay is highly committed to security. For this reason, whenever sensitive information such as emails or wallet addresses are transmitted to the widget, you are required to use the signature parameter, otherwise, the MoonPay widget will not load. This measure makes it more difficult for unauthorized third parties to misuse the the widget's pre-fill feature.
A signed URL helps limit access from unauthorized third parties by providing limited permissions and time to make a request. Passing the signature parameter is mandatory if you're using the walletAddress or walletAddresses parameter and it must be appended at the end of the URL. If your widget URL contains sensitive information, we strongly recommend using the signature parameter.
You can generate a signature of the URL server-side and append it to the end of the URL. If the signature is provided, we'll check the validity of the query string to make sure it has not been altered. If the signature is invalid for any reason the MoonPay widget will fail to load.
How to sign URLs
Follow these steps for signing URLs:
- Send your widget URL to your backend server.
- Generate the signature using the secret key found in your MoonPay dashboard.
- Use your own code to generate signatures and sign URLs
- Alternatively, use our Node SDK to generate signatures, sign URLs, and validate signatures.
- Return either the signature or entire signed URL.
- If using a SDK, return the signature and use
updateSignature. Do not encode the signature, as the SDK handles this. - If using a URL-based integration, return the entire signed URL. Ensure that the value of
signatureand other parameters are URL-encoded.
- Show the widget using the SDK or URL.
Returning the signature vs entire signed URLIntegrations using an SDK: Return the signature by itself and use
updateSignatureIntegrations using URLs: Return the entire signed URL
How to generate signatures
- Create an HMAC (Hash-Based Message Authentication Code) using the SHA-256 hash function.
- Use your secret API key as the key and the original URL's query string as the message.
- For URL-based integrations, make sure all query parameter values are URL-encoded before creating the signature.
All query parameter values (not the entire query string) need to be URL-encoded before generating the signature in order for it to be valid.
Code examples
Integrations using an SDK
Integrations using a web or mobile SDK should calculate the signature, then return the signature by itself, not URL-encoded.
More details about signing with each SDK:
| Web SDKs | Mobile SDK |
|---|---|
| Web SDK React SDK | React Native SDK |
import crypto from 'crypto';

const secretKey = 'sk_test_key';  // Use your secret key

const generateSignature = (url) => {
  const signature = crypto
    .createHmac('sha256', secretKey)
    .update(new URL(url).search) // Use the query string part of the URL
    .digest('base64'); // Convert the result to a base64 string

  console.log(signature) // Print the signature
  return signature // Return the signature
};
<?php
$host = 'https://buy-sandbox.moonpay.com'; // Base URL
$query = '?apiKey=pk_test_key¤cyCode=eth&walletAddress=0xde0b295669a9fd93d5f28d9ec85e40f4cb697bae'; // Query parameters
$secretKey = 'sk_test_key'; // Your secret key
// Create the HMAC SHA-256 hash and encode it in base64
$signature = base64_encode(hash_hmac('sha256', $query, $secretKey, true));
echo $signature; // Print the signature
?>Integrations using URLs
Integrations generating widget URLs should calculate the signature, URL-encode the signature, then return the whole signed URL.
import crypto from 'crypto';
const originalUrl = 'https://buy-sandbox.moonpay.com?apiKey=pk_test_key¤cyCode=eth&walletAddress=0xde0b295669a9fd93d5f28d9ec85e40f4cb697bae';
const signature = crypto
.createHmac('sha256', 'sk_test_key') // Use your secret key
.update(new URL(originalUrl).search) // Use the query string part of the URL
.digest('base64'); // Convert the result to a base64 string
const urlWithSignature = `${originalUrl}&signature=${encodeURIComponent(signature)}`; // Add the signature to the URL
console.log(urlWithSignature); // Print the signed URL<?php
$host = 'https://buy-sandbox.moonpay.com'; // Base URL
$query = '?apiKey=pk_test_key¤cyCode=eth&walletAddress=0xde0b295669a9fd93d5f28d9ec85e40f4cb697bae'; // Query parameters
$secretKey = 'sk_test_key'; // Your secret key
// Create the HMAC SHA-256 hash and encode it in base64
$signature = base64_encode(hash_hmac('sha256', $query, $secretKey, true));
// URL encode the signature
$encodedSignature = urlencode($signature);
// Combine the base URL, query parameters, and the signature
$signedUrl = $host . $query . "&signature=" . $encodedSignature;
echo $signedUrl; // Print the signed URL
?>
AttentionThe API gateway of some cloud providers change your parameter's order, resulting in a failed signature validation.
App requirements for KYC
When not using a MoonPay SDK, make sure that the following requirements are met so that users can successfully complete KYC (Know Your Customer) steps.
These requirements make sure that customers can complete each KYC step, including uploading documents and doing a selfie check. Failing to follow these steps will cause new customers to drop off, as they won't be able to finish KYC or make a purchase.
General app requirements for all implementations
All partner apps should ensure the following:
-
Feature-Policyheader for your webpage / frame or any other container has no restrictions for initializing camera like valuecamera 'none'. -
Permissions-Policyheader doesn't restrict access to a camera and microphone (for some cases) and if allow is set check for"camera; microphone"values. - When using iOS WKWebview you may need to set
allowsInlineMediaPlaybacktotruein theWKWebViewConfigurationused in your app. This adjustment ensures that media content, like a camera feed, can be displayed properly within the web view, rather than forcing full-screen playback. - Your website is being run on a secure
httpsconnection.
WebView requirements
Partner apps that use WebView should ensure the following:
- The web view is able to access device local storage and initialize camera (for older iOS versions, the camera can be accessed only from Safari browser or WebView with
SFSafariViewController) - HTML5 video playback is allowed (
<video>tags are being used to send instructions): if video-instructions are not played, try usingWebChromeClientto enable video playback - Autoplay in fullscreen mode is disabled and
allowsInlineMediaPlaybackis set astruefor WebView - The selector file is implemented on your side (required for KYC document uploads)
Iframe requirements
Partner apps that use iframe should ensure the following:
-
Parent page header has no restrictions for initializing the camera, e.g.
camera=()- Parent page can alternatively include
camera=*in the Permissions-Policy header
- Parent page can alternatively include
-
The iframe allow property has
allow="accelerometer; autoplay; camera; encrypted-media; gyroscope; payment"
Updated 10 days ago