
Creating Passes
To generate a pass, you must invoke the POST /v0/passes endpoint in our API. This endpoint is specifically designed to facilitate the creation of passes. By sending a POST request with the required parameters, you can seamlessly create and manage passes in your system.
Wallet-Based Pass Creation
Creating a Pass directly tied to a wallet allows you to offer benefits or access to users based on their specific wallet ownership.
The simplest way to create a pass tied to a wallet is to include the wallet parameter with your POST request and ensure it contains values for the chain and address properties.
const payload = {
  wallet: {
    chain: {
      name: "evm",
      network: 1,
    },
    address: "0xA8C62111e4652b07110A0FC81816303c42632f64",
    signature:
      "0x71147d2b97a397061e6dbd82351867a7057bdb4d9566a8ac2d618e1a3e62d43c722245fb4e6a8e9ee814348bdd5c433224c8c10f9fadf7fd154b44c17056109f1c",
    signatureMessage: "Sign this message to generate a pass with ethpass.xyz",
  },
};

const response = await fetch("https://api.ethpass.xyz/api/v0/passes", {
  method: "POST",
  body: JSON.stringify(payload),
  headers: new Headers({
    "content-type": "application/json",
    "X-API-KEY": "YOUR_SECRET_API_KEY",
  }),
});
Verifying wallet signature
You can create a pass tied to any arbitrary wallet address. However, if you wish to verify that the wallet's ownership corresponds to the user making the request, you can prompt them to sign a message. To do this, include the additional properties: signatureMessage (an arbitrary text message the user signs) and signature (the resulting hash of the signature).
Here's an example using wagmi useSigner React hook.
const { data: signer } = useSigner(); // NOTE: wallet must already be connected
const signatureMessage = `Sign this message to generate a test pass with ethpass.xyz\n${Date.now()}`;
const signature = await signer.signMessage(signatureMessage);

const payload = {
  wallet: {
    chain: {
      name: "evm",
      network: 1,
    },
    address: "0xA8C62111e4652b07110A0FC81816303c42632f64",
    signature:
      "0x71147d2b97a397061e6dbd82351867a7057bdb4d9566a8ac2d618e1a3e62d43c722245fb4e6a8e9ee814348bdd5c433224c8c10f9fadf7fd154b44c17056109f1c",
    signatureMessage: "Sign this message to generate a pass with ethpass.xyz",
  },
};
Info
When these values are provided, our API will cross-check the signature to ensure it aligns with the address you've submitted. After verification, the pass model response will feature a boolean parameter,
signatureVerified, indicating whether a valid signature has been authenticated for the wallet linked with the pass.
Wallet Delegation
Wallet delegation provides a strategic separation of responsibilities between two distinct wallets within a blockchain system. It facilitates a balance between security and transactional capability by pairing a cold wallet, which is kept offline to store digital assets securely, with a hot wallet, maintained online for transactional activities.
By delegating authority from the cold wallet to the hot wallet, the latter can validate asset ownership without requiring the cold wallet to be online or exposing its private keys. This arrangement amplifies the security of digital assets, as the offline nature of the cold wallet minimizes its vulnerability to potential hacks and other security risks.
Our API supports currently supports the following registries.
The process involves including a delegation parameter within wallet. The delegation parameter holds the information of the entity that will be delegated, including its registry name and wallet address. This entity is commonly referred to as the "vault address" or "cold wallet".
In the example provided, the wallet address 0x79c1d53f15e34895d608ff47ee56ad1f0f3f45d2is the wallet that holds the NFT, and the user submitting the signature is acting as a delegate on behalf of this wallet.
const payload = {
  wallet: {
    chain: {
      name: "evm",
      network: 1,
    },
    address: "0xA8C62111e4652b07110A0FC81816303c42632f64",
    delegation: {
      registry: "delegate.cash",
      vaultAddress: "0x79c1d53f15e34895d608ff47ee56ad1f0f3f45d2",
    },
    signature:
      "0x71147d2b97a397061e6dbd82351867a7057bdb4d9566a8ac2d618e1a3e62d43c722245fb4e6a8e9ee814348bdd5c433224c8c10f9fadf7fd154b44c17056109f1c",
    signatureMessage: "Sign this message to generate a pass with ethpass.xyz",
  },

  nft: {
    contractAddress: "0x79c1d53f15e34895d608ff47ee56ad1f0f3f45d3",
    tokenId: "443",
  },
};

const response = await fetch(`https://api.ethpass.xyz/api/v0/passes/${data}`, {
  method: "PATCH",
  body: JSON.stringify(payload),
  headers: new Headers({
    "content-type": "application/json",
    "X-API-KEY": "YOUR_SECRET_API_KEY",
  }),
});
Creating a Pass Linked to an NFT
Creating a pass linked to a Non-Fungible Token (NFT) involves a series of steps that validate the token's authenticity and ownership. This one-to-one relationship ensures that the pass remains valid as long as the underlying NFT is owned by the pass holder.
To establish this link, you need to include the following nft property in your payload. This information specifies the contract address of the NFT and its unique token ID.
Warning
If the smart contract supports both the ERC721 and ERC-1155 token standards, it's essential to specify the correct interface. For ERC721, use the contractInterface value "0x80ac58cd", and for ERC-1155, use "0xd9b67a26". By accurately providing this parameter, you ensure the system recognizes and interacts with the token standard correctly.
const payload = {
  wallet,
  nft: {
    contractAddress: "0x79c1d53f15e34895d608ff47ee56ad1f0f3f45d3",
    tokenId: "443",
  },
};

const response = await fetch("https://api.ethpass.xyz/api/v0/passes", {
  method: "POST",
  body: JSON.stringify(payload),
  headers: new Headers({
    "content-type": "application/json",
    "X-API-KEY": "YOUR_SECRET_API_KEY",
  }),
});
Creating a Pass Linked To Policies
Before diving into the process of creating a pass from policies, it's imperative to read more about Policies. Familiarize yourself with policy creation because you'll need the ID of the policy you create to populate the policies object in the POST request.
Creating a pass from policies empowers you to set specific rules and conditions that a user must fulfill to be issued a pass. With policy-based pass creation, you can craft tailored criteria, whether it's membership eligibility, purchase prerequisites, or regulatory compliance. This ensures that only individuals meeting your specified conditions are eligible to receive the pass.
const payload = {
  wallet,
  policies: [
    "f0b2519c-df60-44bc-a611-dd18aacf5429",
    "3d24bee6-e0f0-4426-8433-e575b230a7a6",
  ],
};

const response = await fetch("https://api.ethpass.xyz/api/v0/passes", {
  method: "POST",
  body: JSON.stringify(payload),
  headers: new Headers({
    "content-type": "application/json",
    "X-API-KEY": "YOUR_SECRET_API_KEY",
  }),
});
Designing the layout of your passes
With the diversity in mobile wallets like Apple Wallet and Google Wallet, integrating passes becomes a task demanding careful attention to each platform's unique APIs. To simplify this, we introduce a unified format that mainly mirrors Apple's API, but is also compatible with Google Wallet. Instead of juggling multiple payloads for each platform, with Universal Pass, you can configure a pass with just one payload.
Defining the Layout
The layout property acts as the central decision-maker for the format of your pass. Depending on which key you set (universal, apple, or google), the corresponding layout is used.
| Value | Description |
|---|---|
| universal | If set, both Apple and Google will use the provided UniversalPass layout. |
| apple | Specific layout for Apple Wallet. |
| Specific layout for Google Wallet. |
Field Breakdown
The payload shape for each key in the layout property is as defined in the table below.
Info
Note that certain fields are exclusive to Apple
| Field * Apple only | Description |
|---|---|
logoText | Text accompanying the logo. |
description* | A brief description of the pass. |
labelColor * | Color of the field labels. |
foregroundColor * | Primary color of the text. |
backgroundColor | Background color of the pass. |
headerFields | Fields that appear in the header. |
primaryFields | The most important information, prominently displayed. |
secondaryFields | Additional information, displayed beneath the primary fields. |
auxiliaryFields | Extra details, typically at the bottom. |
backFields * | Information that appears on the back of the pass. |
Example Layout
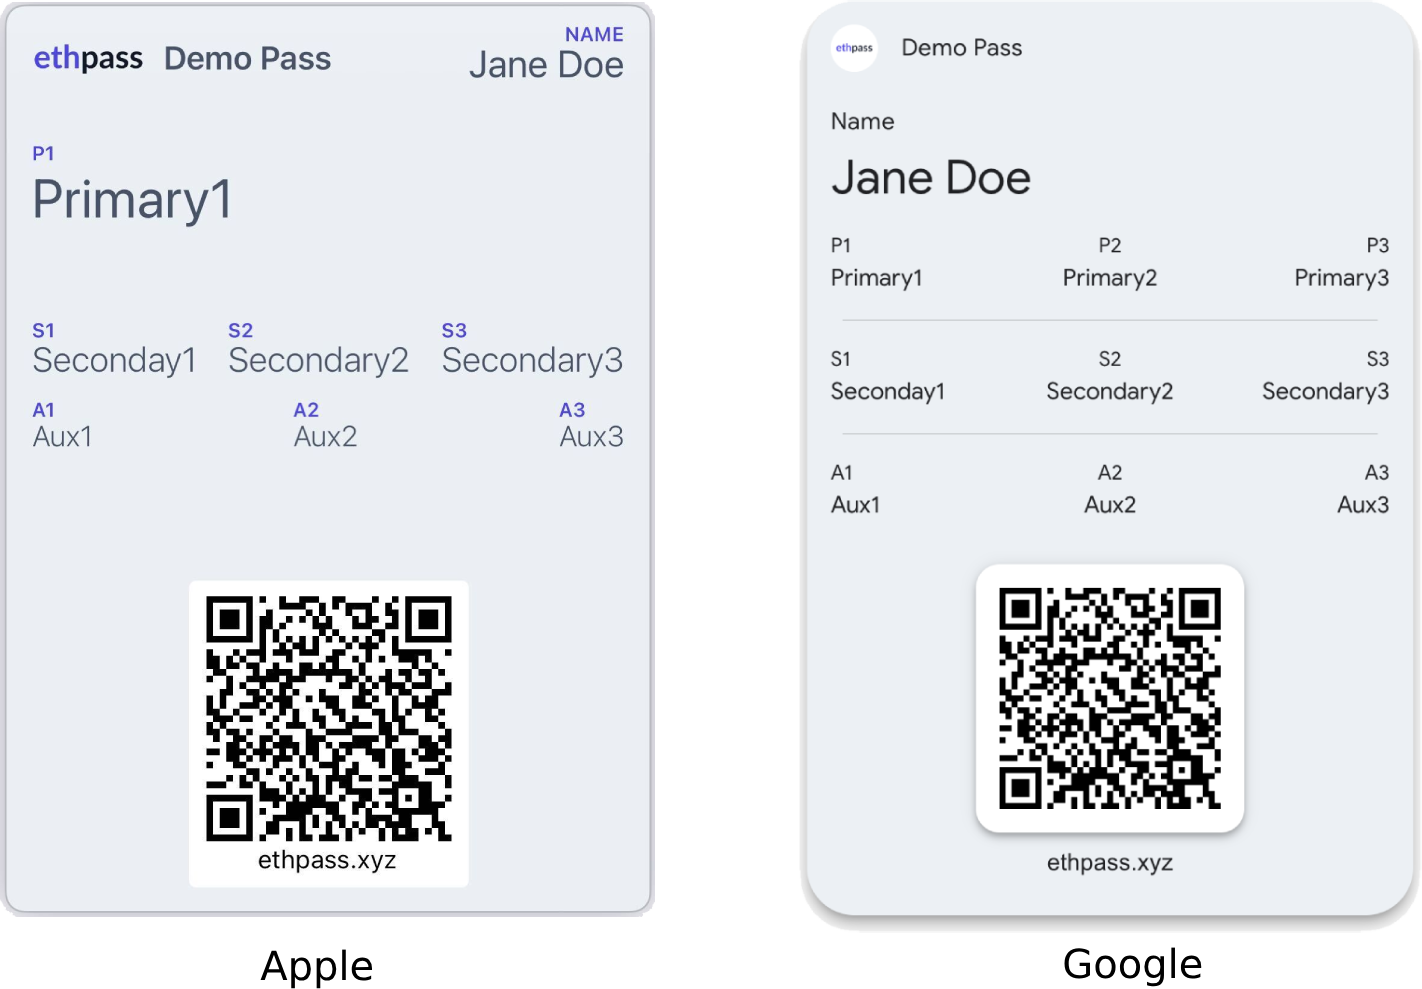
Here is an example of the content that can be rendered on the front of the passes using our universal pass payload.
Info
For Apple passes, the layout varies depending on your template and pass type. The pass type determines the field rendering and how many fields each row can accommodate. Incorporating a strip image in your template reduces the number of fields that can be displayed due to space constraints. For a detailed understanding of field placements based on pass type, refer to Apple's official documentation

const payload = {
  wallet,
  layout: {
    universal: {
      logoText: "Demo Pass",
      description: "This is a demo pass",
      headerFields: [
        {
          label: "Name",
          value: "Jane Doe",
        },
      ],
      primaryFields: [
        {
          alignment: "left",
          label: "P1",
          value: "Primary1",
        },
        {
          alignment: "middle",
          label: "P2",
          value: "Primary2",
        },
        {
          alignment: "right",
          label: "P3",
          value: "Primary3",
        },
      ],
      secondaryFields: [
        {
          alignment: "left",
          label: "S1",
          value: "Seconday1",
        },
        {
          alignment: "middle",
          label: "S2",
          value: "Secondary2",
        },
        {
          alignment: "right",
          label: "S3",
          value: "Secondary3",
        },
      ],
      auxiliaryFields: [
        {
          alignment: "left",
          label: "A1",
          value: "Aux1",
        },
        {
          alignment: "middle",
          label: "A2",
          value: "Aux2",
        },
        {
          alignment: "right",
          label: "A3",
          value: "Aux3",
        },
      ],
      backFields: [
        {
          label: "Back1",
          value: "Back 1",
        },
        {
          label: "Back2",
          value: "Back 2",
        },
      ],
    },
  },
};

const response = await fetch("https://api.ethpass.xyz/api/v0/passes", {
  method: "POST",
  body: JSON.stringify(payload),
  headers: new Headers({
    "content-type": "application/json",
    "X-API-KEY": "YOUR_SECRET_API_KEY",
  }),
});
Warning
"Universal Passes" is still under active development. We're constantly refining its integration with native APIs. Your feedback is invaluable to us. We highly encourage you to share your thoughts and suggestions to improve the documentation's quality.
Preventing the Creation of Duplicate Passes
The ethpass API is designed to be flexible and non-custodial, meaning it will not restrict the creation of passes with duplicate parameters. To avoid creating duplicate passes, it is recommended to implement a check in your creation process to check if a pass with the same parameters already exists.
You can find more details on how to do that here.
Updated 11 months ago